Tutorial
First make sure you have installed pyfhd following the instructions in the
Installation Guide.
Let’s start with getting you off the ground and running using the sample data
built into pyfhd. The example data is a small subset of the observation
1088285600 with a beam that uses only one frequency, and model visibilities
simulated using WODEN. To run pyfhd we will use the command line interface
(CLI) that has been built to run pyfhd.
Sample Data
To run the example data, you’ll need to get the sample data first, to do this run:
pyfhd --get-sample-data 1088285600
Which will copy the sample data built into the pyfhd package to your current
working directory, inside a directory and sub-directory called input/1088285600_example.
Running the sample data
From there in that directory, you should be able to run the following command to run the example data:
pyfhd -c ./input/1088285600_example/1088285600_example.yaml 1088285600
The command on most machines takes 1-2 minutes to run, and the output is stored
in the output directory.
This will run the entire pyfhd pipeline in this order:
Setting up the run with logs and outputs
Extracting visibilities
Creating the observation metadata dictionary (and other metadata dictionaries)
Import the beam
Importing the skymodel
Running calibration
Flagging
Gridding
Exporting the results
Generating HEALPIX fits and HEALPIX files (in HDF5 format)
Finishing the run and cleaning up
If the command runs successfully you should get a log to your terminal (stdout) that looks something like this:
Sample Data pyfhd Collapsible Log
ooooooooo.               oooooooooooo ooooo   ooooo oooooooooo.
8888   `Y88.             8888       8 8888    888   888     Y8b
888   .d88' oooo    ooo  888          888     888   888      888
888ooo88P'   `88.  .8'   888oooo8     888ooooo888   888      888
888           `88..8'    888          888     888   888      888
888            `888'     888          888     888   888     d88'
o888o            .8'     o888o        o888o   o888o o888bood8P'
            .o..P'
            `Y8P'

Python Fast Holographic Deconvolution

Translated from IDL to Python as a collaboration between Astronomy Data and
Computing Services (ADACS) and the Epoch of Reionisation (EoR) Team.

Repository: https://github.com/EoRImaging/pyfhd

Documentation: https://pyfhd.readthedocs.io/en/latest/

Git Commit Hash: 467cb91bcba3f06cded5405f3ffcc9638bd13c26


pyfhd Run Started At: Fri May 30 09:52:35 2025

Observation ID: 1088285600

Confifuration File: ./input/1088285600 example/1088285600 example.yaml

Validating your input...

2025-05-30 09:52:35 - INFO:
  Logging and configuration file created and copied to here: /home/skywatcher/projects/pyfhd/output/pyfhd_1088285600_example
2025-05-30 09:52:35 - INFO:
  Input validated, starting pyfhd run now
2025-05-30 09:52:35 - INFO:
  Reading in visibilities from: input/1088285600_example/1088285600.uvfits
2025-05-30 09:52:35 - WARNING:
  OBSRA not found in UVFITS file
2025-05-30 09:52:35 - WARNING:
  OBSDEC not found in UVFITS file
2025-05-30 09:52:35 - INFO:
  Setting mwa instrument location to: lon 116.67, lat -26.70, alt 377.83
2025-05-30 09:52:35 - INFO:
  pyfhd Header Created completed in: 44.74807 milliseconds
2025-05-30 09:52:35 - INFO:
  Params Created completed in: 0.27895 milliseconds
2025-05-30 09:52:35 - INFO:
  Visibilities Extracted completed in: 9.38296 milliseconds
2025-05-30 09:52:35 - INFO:
  Writing the visibilities array to output/pyfhd_1088285600_example/visibilities/1088285600_raw_vis_arr.h5
2025-05-30 09:52:35 - INFO:
  Writing the weights array to output/pyfhd_1088285600_example/visibilities/1088285600_raw_vis_weights.h5
2025-05-30 09:52:35 - WARNING:
  Number of Leap Seconds is missing and the time system isn't IAT so we can't know the leap seconds, setting as -1
2025-05-30 09:52:35 - WARNING:
  PolA params is missing from the UVFITS, set to array of zeros of length n_pol_cal_params or 0
2025-05-30 09:52:35 - WARNING:
  PolB params is missing from the UVFITS, set to array of zeros of length n_pol_cal_params or 0
2025-05-30 09:52:35 - INFO:
  Diameters not in UVFITS file continuing.
2025-05-30 09:52:35 - INFO:
  Beam Full Width Half maximum not present in UVFITS continuing.
2025-05-30 09:52:35 - INFO:
  Writing the layout dict to output/pyfhd_1088285600_example/layout.h5, each key will be a dataset, if the key contains a dict then it will be a group.
2025-05-30 09:52:35 - INFO:
  Layout Dictionary Extracted completed in: 7.91407 milliseconds
2025-05-30 09:52:38 - INFO:
  Obs Dictionary Created completed in: 2.92785 seconds
2025-05-30 09:52:38 - INFO:
  Writing the obs_checkpoint dict to output/pyfhd_1088285600_example/checkpoints/1088285600_example_obs_checkpoint.h5, each key will be a dataset, if the key contains a dict then it will be a group.
2025-05-30 09:52:39 - INFO:
  Checkpoint Saved: Uncalibrated visibility parameters, array and weights and the observation metadata dictionary saved into output/pyfhd_1088285600_example/obs_checkpoint.h5
2025-05-30 09:52:39 - INFO:
  Reading in the HDF5 file input/1088285600_example/gauss_beam_pointing0_167635008Hz.h5
2025-05-30 09:52:39 - INFO:
  Loading input/1088285600_example/gauss_beam_pointing0_167635008Hz.h5 into a dictionary
2025-05-30 09:52:39 - INFO:
  Beam and PSF dictionary imported. completed in: 301.2073 milliseconds
2025-05-30 09:52:39 - INFO:
  Basic Flagging Completed completed in: 2.48504 milliseconds
2025-05-30 09:52:40 - INFO:
  Visibilities Weights Updated After Basic Flagging completed in: 1.17173 seconds
2025-05-30 09:52:40 - INFO:
  Reading in model visibilities from: /home/skywatcher/projects/pyfhd/input/1088285600_example/1088285600_model.uvfits
2025-05-30 09:52:40 - INFO:
  Setting mwa instrument location to: lon 116.67, lat -26.70, alt 377.83
2025-05-30 09:52:40 - WARNING:
  Model time stamps are offset from data by an average of 1.0. Accounting for this to match model time steps to data
2025-05-30 09:52:40 - INFO:
  Found flagged tiles [4, 124] in the data, flagging from the model
2025-05-30 09:52:40 - INFO:
  Model Imported and Flagged From UVFITS completed in: 20.36548 milliseconds
2025-05-30 09:52:40 - INFO:
  Beginning Calibration
2025-05-30 09:52:40 - INFO:
  Gain initialized beginning vis_calibrate subroutine
2025-05-30 09:52:40 - INFO:
  Beginning Calibration for polarization 0 (XX)
2025-05-30 09:52:40 - INFO:
  Convergence was reached for polarization: XX (0) and frequency: 1, with a convergence of: 9.98593970029745e-08 and the threshold was: 1e-07
2025-05-30 09:52:40 - INFO:
  Convergence was reached for polarization: XX (0) and frequency: 2, with a convergence of: 9.999992919655905e-08 and the threshold was: 1e-07
2025-05-30 09:52:40 - INFO:
  Convergence was reached for polarization: XX (0) and frequency: 3, with a convergence of: 8.344520524730864e-08 and the threshold was: 1e-07
2025-05-30 09:52:41 - INFO:
  Convergence was reached for polarization: XX (0) and frequency: 4, with a convergence of: 9.884876342819337e-08 and the threshold was: 1e-07
2025-05-30 09:52:41 - INFO:
  Convergence was reached for polarization: XX (0) and frequency: 5, with a convergence of: 8.003533551747955e-08 and the threshold was: 1e-07
2025-05-30 09:52:41 - INFO:
  Convergence was reached for polarization: XX (0) and frequency: 6, with a convergence of: 8.544033568047118e-08 and the threshold was: 1e-07
2025-05-30 09:52:41 - INFO:
  Convergence was reached for polarization: XX (0) and frequency: 7, with a convergence of: 8.130504801062689e-08 and the threshold was: 1e-07
2025-05-30 09:52:41 - INFO:
  Convergence was reached for polarization: XX (0) and frequency: 8, with a convergence of: 9.104656101282636e-08 and the threshold was: 1e-07
2025-05-30 09:52:41 - INFO:
  Convergence was reached for polarization: XX (0) and frequency: 9, with a convergence of: 8.354614840674757e-08 and the threshold was: 1e-07
2025-05-30 09:52:41 - INFO:
  Convergence was reached for polarization: XX (0) and frequency: 10, with a convergence of: 9.918106515438548e-08 and the threshold was: 1e-07
2025-05-30 09:52:41 - INFO:
  Convergence was reached for polarization: XX (0) and frequency: 11, with a convergence of: 9.869434977124244e-08 and the threshold was: 1e-07
2025-05-30 09:52:42 - INFO:
  Convergence was reached for polarization: XX (0) and frequency: 12, with a convergence of: 8.895645139753463e-08 and the threshold was: 1e-07
2025-05-30 09:52:42 - INFO:
  Convergence was reached for polarization: XX (0) and frequency: 13, with a convergence of: 9.459813804237299e-08 and the threshold was: 1e-07
2025-05-30 09:52:42 - INFO:
  Beginning Calibration for polarization 1 (YY)
2025-05-30 09:52:42 - INFO:
  Convergence was reached for polarization: YY (1) and frequency: 1, with a convergence of: 8.583005611987811e-08 and the threshold was: 1e-07
2025-05-30 09:52:42 - INFO:
  Convergence was reached for polarization: YY (1) and frequency: 2, with a convergence of: 8.466878902748548e-08 and the threshold was: 1e-07
2025-05-30 09:52:42 - INFO:
  Convergence was reached for polarization: YY (1) and frequency: 3, with a convergence of: 9.921026305432663e-08 and the threshold was: 1e-07
2025-05-30 09:52:42 - INFO:
  Convergence was reached for polarization: YY (1) and frequency: 4, with a convergence of: 8.426838709848088e-08 and the threshold was: 1e-07
2025-05-30 09:52:42 - INFO:
  Convergence was reached for polarization: YY (1) and frequency: 5, with a convergence of: 8.969077306790065e-08 and the threshold was: 1e-07
2025-05-30 09:52:42 - INFO:
  Convergence was reached for polarization: YY (1) and frequency: 6, with a convergence of: 9.584932160621179e-08 and the threshold was: 1e-07
2025-05-30 09:52:43 - INFO:
  Convergence was reached for polarization: YY (1) and frequency: 7, with a convergence of: 9.976283744227554e-08 and the threshold was: 1e-07
2025-05-30 09:52:43 - INFO:
  Convergence was reached for polarization: YY (1) and frequency: 8, with a convergence of: 9.165962316245378e-08 and the threshold was: 1e-07
2025-05-30 09:52:43 - INFO:
  Convergence was reached for polarization: YY (1) and frequency: 9, with a convergence of: 8.711660483214532e-08 and the threshold was: 1e-07
2025-05-30 09:52:43 - INFO:
  Convergence was reached for polarization: YY (1) and frequency: 10, with a convergence of: 8.482012447714498e-08 and the threshold was: 1e-07
2025-05-30 09:52:43 - INFO:
  Convergence was reached for polarization: YY (1) and frequency: 11, with a convergence of: 8.962296769672843e-08 and the threshold was: 1e-07
2025-05-30 09:52:43 - INFO:
  Convergence was reached for polarization: YY (1) and frequency: 12, with a convergence of: 8.715709933918354e-08 and the threshold was: 1e-07
2025-05-30 09:52:43 - INFO:
  Convergence was reached for polarization: YY (1) and frequency: 13, with a convergence of: 8.780971269246983e-08 and the threshold was: 1e-07
2025-05-30 09:52:43 - INFO:
  Function vis_calibrate_subroutine has completed.
2025-05-30 09:52:43 - INFO:
  Flagging Calibration has been activated and calibration will now be flagged
2025-05-30 09:52:43 - INFO:
  You have chosen to perform a bandpass calculation and calibration
2025-05-30 09:52:43 - WARNING:
  /home/skywatcher/projects/pyfhd/src/pyfhd/pyfhd_tools/pyfhd_utils.py:709: RuntimeWarning: overflow encountered in divide
  result[i_use] = 1 / weights[i_use]

2025-05-30 09:52:43 - INFO:
  You have selected to perform polynomial fits over the frequency band
2025-05-30 09:52:44 - INFO:
  Applying the calibration
2025-05-30 09:52:44 - INFO:
  Saving the ratio and sigma average variance
2025-05-30 09:52:44 - INFO:
  Calculating statistics from calibration
2025-05-30 09:52:44 - INFO:
  Plotting the calibration solutions into output/pyfhd_1088285600_example/plots/calibration
2025-05-30 09:52:55 - INFO:
  Visibilities calibrated and cal dictionary with gains created completed in: 15.02258 seconds
2025-05-30 09:52:55 - INFO:
  Visibilities Weights Updated After Calibration completed in: 50.36974 milliseconds
2025-05-30 09:52:55 - INFO:
  Noise Calculated and added to obs completed in: 7.34496 milliseconds
2025-05-30 09:52:55 - INFO:
  Writing the calibrate_checkpoint dict to output/pyfhd_1088285600_example/checkpoints/1088285600_example_calibrate_checkpoint.h5, each key will be a dataset, if the key contains a dict then it will be a group.
2025-05-30 09:52:56 - INFO:
  Checkpoint Saved: Calibrated and Flagged visibility parameters, array and weights, the flagged observation metadata dictionary and the calibration dictionary saved into output/pyfhd_1088285600_example/calibrate_checkpoint.h5
2025-05-30 09:52:56 - INFO:
  Gridding has begun for polarization XX
2025-05-30 09:52:57 - INFO:
  Gridding  visibilities for baseline 2782 of 27825 for polarization XX
2025-05-30 09:52:57 - INFO:
  Gridding  visibilities for baseline 5564 of 27825 for polarization XX
2025-05-30 09:52:58 - INFO:
  Gridding  visibilities for baseline 8346 of 27825 for polarization XX
2025-05-30 09:52:59 - INFO:
  Gridding  visibilities for baseline 11128 of 27825 for polarization XX
2025-05-30 09:52:59 - INFO:
  Gridding  visibilities for baseline 13910 of 27825 for polarization XX
2025-05-30 09:53:00 - INFO:
  Gridding  visibilities for baseline 16692 of 27825 for polarization XX
2025-05-30 09:53:01 - INFO:
  Gridding  visibilities for baseline 19474 of 27825 for polarization XX
2025-05-30 09:53:02 - INFO:
  Gridding  visibilities for baseline 22256 of 27825 for polarization XX
2025-05-30 09:53:03 - INFO:
  Gridding  visibilities for baseline 25038 of 27825 for polarization XX
2025-05-30 09:53:04 - INFO:
  Gridding  visibilities for baseline 27820 of 27825 for polarization XX
2025-05-30 09:53:04 - INFO:
  Gridding has finished for polarization XX
2025-05-30 09:53:04 - INFO:
  Gridding has begun for polarization YY
2025-05-30 09:53:05 - INFO:
  Gridding  visibilities for baseline 2782 of 27825 for polarization YY
2025-05-30 09:53:06 - INFO:
  Gridding  visibilities for baseline 5564 of 27825 for polarization YY
2025-05-30 09:53:06 - INFO:
  Gridding  visibilities for baseline 8346 of 27825 for polarization YY
2025-05-30 09:53:07 - INFO:
  Gridding  visibilities for baseline 11128 of 27825 for polarization YY
2025-05-30 09:53:08 - INFO:
  Gridding  visibilities for baseline 13910 of 27825 for polarization YY
2025-05-30 09:53:08 - INFO:
  Gridding  visibilities for baseline 16692 of 27825 for polarization YY
2025-05-30 09:53:09 - INFO:
  Gridding  visibilities for baseline 19474 of 27825 for polarization YY
2025-05-30 09:53:10 - INFO:
  Gridding  visibilities for baseline 22256 of 27825 for polarization YY
2025-05-30 09:53:11 - INFO:
  Gridding  visibilities for baseline 25038 of 27825 for polarization YY
2025-05-30 09:53:13 - INFO:
  Gridding  visibilities for baseline 27820 of 27825 for polarization YY
2025-05-30 09:53:13 - INFO:
  Gridding has finished for polarization YY
2025-05-30 09:53:13 - INFO:
  Plotting the continuum gridding outputs into output/pyfhd_1088285600_example/plots/gridding
2025-05-30 09:53:19 - INFO:
  Writing the gridding_checkpoint dict to output/pyfhd_1088285600_example/checkpoints/1088285600_example_gridding_checkpoint.h5, each key will be a dataset, if the key contains a dict then it will be a group.
2025-05-30 09:53:25 - INFO:
  Checkpoint Saved: The Gridded UV Planes saved into output/pyfhd_1088285600_example/gridding_checkpoint.h5
2025-05-30 09:53:25 - INFO:
  Visibilities gridded completed in: 29.42883 seconds
2025-05-30 09:53:25 - INFO:
  Saving the obs dictionary to output/pyfhd_1088285600_example/metadata/1088285600_obs.h5
2025-05-30 09:53:25 - INFO:
  Writing the obs dict to output/pyfhd_1088285600_example/metadata/1088285600_obs.h5, each key will be a dataset, if the key contains a dict then it will be a group.
2025-05-30 09:53:25 - INFO:
  Saving params dictionary to output/pyfhd_1088285600_example/metadata/1088285600_params.h5
2025-05-30 09:53:25 - INFO:
  Writing the params dict to output/pyfhd_1088285600_example/metadata/1088285600_params.h5, each key will be a dataset, if the key contains a dict then it will be a group.
2025-05-30 09:53:25 - INFO:
  Saving the gridded uv planes to output/pyfhd_1088285600_example/gridding
2025-05-30 09:53:25 - INFO:
  Writing the image_uv array to output/pyfhd_1088285600_example/gridding/1088285600_image_uv.h5
2025-05-30 09:53:27 - INFO:
  Writing the weights_uv array to output/pyfhd_1088285600_example/gridding/1088285600_weights_uv.h5
2025-05-30 09:53:28 - INFO:
  Writing the variance_uv array to output/pyfhd_1088285600_example/gridding/1088285600_variance_uv.h5
2025-05-30 09:53:29 - INFO:
  Writing the uniform_filter_uv array to output/pyfhd_1088285600_example/gridding/1088285600_uniform_filter_uv.h5
2025-05-30 09:53:29 - INFO:
  Writing the model_uv array to output/pyfhd_1088285600_example/gridding/1088285600_model_uv.h5
2025-05-30 09:53:31 - INFO:
  Saving the calibrated visibilities to output/pyfhd_1088285600_example/visibilities/1088285600_calibrated_vis_arr.h5
2025-05-30 09:53:31 - INFO:
  Writing the visibilities array to output/pyfhd_1088285600_example/visibilities/1088285600_calibrated_vis_arr.h5
2025-05-30 09:53:31 - INFO:
  Saving the calibration dictionary to output/pyfhd_1088285600_example/calibration/1088285600_cal.h5
2025-05-30 09:53:31 - INFO:
  Writing the cal dict to output/pyfhd_1088285600_example/calibration/1088285600_cal.h5, each key will be a dataset, if the key contains a dict then it will be a group.
2025-05-30 09:53:31 - INFO:
  Saving the calibrated weights to output/pyfhd_1088285600_example/visibilities/1088285600_calibrated_vis_weights.h5
2025-05-30 09:53:31 - INFO:
  Writing the weights array to output/pyfhd_1088285600_example/visibilities/1088285600_calibrated_vis_weights.h5
2025-05-30 09:53:34 - INFO:
  Using filter_uv_uniform for dirty_image_generate
2025-05-30 09:53:34 - INFO:
  Using filter_uv_uniform for dirty_image_generate
2025-05-30 09:53:36 - INFO:
  Building the FITS Header for all the FITS files
2025-05-30 09:53:36 - INFO:
  Saving the FITS files for polarization XX
2025-05-30 09:53:36 - INFO:
  Plotting the continuum images for polarization XX into output/pyfhd_1088285600_example/plots/images
2025-05-30 09:53:36 - WARNING:
  /home/skywatcher/projects/pyfhd/.venv/lib/python3.13/site-packages/astropy/wcs/wcs.py:537: FITSFixedWarning: RADECSYS= 'ICRS ' / Reference Frame
the RADECSYS keyword is deprecated, use RADESYSa.
  wcsprm = _wcs.Wcsprm(

2025-05-30 09:53:37 - WARNING:
  /home/skywatcher/projects/pyfhd/.venv/lib/python3.13/site-packages/astropy/wcs/wcs.py:537: FITSFixedWarning: RADECSYS= 'ICRS ' / Reference Frame
the RADECSYS keyword is deprecated, use RADESYSa.
  wcsprm = _wcs.Wcsprm(

2025-05-30 09:53:38 - WARNING:
  /home/skywatcher/projects/pyfhd/.venv/lib/python3.13/site-packages/astropy/wcs/wcs.py:537: FITSFixedWarning: RADECSYS= 'ICRS ' / Reference Frame
the RADECSYS keyword is deprecated, use RADESYSa.
  wcsprm = _wcs.Wcsprm(

2025-05-30 09:53:38 - WARNING:
  /home/skywatcher/projects/pyfhd/.venv/lib/python3.13/site-packages/astropy/wcs/wcs.py:537: FITSFixedWarning: RADECSYS= 'ICRS ' / Reference Frame
the RADECSYS keyword is deprecated, use RADESYSa.
  wcsprm = _wcs.Wcsprm(

2025-05-30 09:53:39 - WARNING:
  FITS data must be a 2D array, no image made for output/pyfhd_1088285600_example/fits/1088285600_uv_weights_XX.fits.
2025-05-30 09:53:39 - INFO:
  Saving the FITS files for polarization YY
2025-05-30 09:53:39 - INFO:
  Plotting the continuum images for polarization YY into output/pyfhd_1088285600_example/plots/images
2025-05-30 09:53:39 - WARNING:
  /home/skywatcher/projects/pyfhd/.venv/lib/python3.13/site-packages/astropy/wcs/wcs.py:537: FITSFixedWarning: RADECSYS= 'ICRS ' / Reference Frame
the RADECSYS keyword is deprecated, use RADESYSa.
  wcsprm = _wcs.Wcsprm(

2025-05-30 09:53:40 - WARNING:
  /home/skywatcher/projects/pyfhd/.venv/lib/python3.13/site-packages/astropy/wcs/wcs.py:537: FITSFixedWarning: RADECSYS= 'ICRS ' / Reference Frame
the RADECSYS keyword is deprecated, use RADESYSa.
  wcsprm = _wcs.Wcsprm(

2025-05-30 09:53:41 - WARNING:
  /home/skywatcher/projects/pyfhd/.venv/lib/python3.13/site-packages/astropy/wcs/wcs.py:537: FITSFixedWarning: RADECSYS= 'ICRS ' / Reference Frame
the RADECSYS keyword is deprecated, use RADESYSa.
  wcsprm = _wcs.Wcsprm(

2025-05-30 09:53:42 - WARNING:
  /home/skywatcher/projects/pyfhd/.venv/lib/python3.13/site-packages/astropy/wcs/wcs.py:537: FITSFixedWarning: RADECSYS= 'ICRS ' / Reference Frame
the RADECSYS keyword is deprecated, use RADESYSa.
  wcsprm = _wcs.Wcsprm(

2025-05-30 09:53:43 - WARNING:
  FITS data must be a 2D array, no image made for output/pyfhd_1088285600_example/fits/1088285600_uv_weights_YY.fits.
2025-05-30 09:53:43 - INFO:
  Loading /home/skywatcher/projects/pyfhd/src/pyfhd/templates/EoR0_high_healpix_inds.h5 into a dictionary
2025-05-30 09:53:44 - WARNING:
  All data flagged or cut!
2025-05-30 09:53:44 - ERROR:
  All data has been flagged
2025-05-30 09:53:44 - WARNING:
  No visibilities gridded for frequency channel [14 15] and polarization XX (0)
2025-05-30 09:53:44 - INFO:
  Writing the 1088285600_even_XX_dirty_uv_arr_gridded_uvf.h5 dict to output/pyfhd_1088285600_example/healpix/uvf_grid/1088285600_even_XX_dirty_uv_arr_gridded_uvf.h5, each key will be a dataset, if the key contains a dict then it will be a group.
2025-05-30 09:53:45 - INFO:
  Writing the 1088285600_even_XX_weights_uv_gridded_uvf.h5 dict to output/pyfhd_1088285600_example/healpix/uvf_grid/1088285600_even_XX_weights_uv_gridded_uvf.h5, each key will be a dataset, if the key contains a dict then it will be a group.
2025-05-30 09:53:46 - INFO:
  Writing the 1088285600_even_XX_variance_uv_arr_gridded_uvf.h5 dict to output/pyfhd_1088285600_example/healpix/uvf_grid/1088285600_even_XX_variance_uv_arr_gridded_uvf.h5, each key will be a dataset, if the key contains a dict then it will be a group.
2025-05-30 09:53:47 - INFO:
  Writing the 1088285600_even_XX_model_uv_arr_gridded_uvf.h5 dict to output/pyfhd_1088285600_example/healpix/uvf_grid/1088285600_even_XX_model_uv_arr_gridded_uvf.h5, each key will be a dataset, if the key contains a dict then it will be a group.
2025-05-30 09:53:49 - INFO:
  Writing the 1088285600_hpx_even_XX dict to output/pyfhd_1088285600_example/healpix/1088285600_hpx_even_XX.h5, each key will be a dataset, if the key contains a dict then it will be a group.
2025-05-30 09:53:51 - WARNING:
  All data flagged or cut!
2025-05-30 09:53:51 - ERROR:
  All data has been flagged
2025-05-30 09:53:51 - WARNING:
  No visibilities gridded for frequency channel [14 15] and polarization YY (1)
2025-05-30 09:53:51 - INFO:
  Writing the 1088285600_even_YY_dirty_uv_arr_gridded_uvf.h5 dict to output/pyfhd_1088285600_example/healpix/uvf_grid/1088285600_even_YY_dirty_uv_arr_gridded_uvf.h5, each key will be a dataset, if the key contains a dict then it will be a group.
2025-05-30 09:53:52 - INFO:
  Writing the 1088285600_even_YY_weights_uv_gridded_uvf.h5 dict to output/pyfhd_1088285600_example/healpix/uvf_grid/1088285600_even_YY_weights_uv_gridded_uvf.h5, each key will be a dataset, if the key contains a dict then it will be a group.
2025-05-30 09:53:53 - INFO:
  Writing the 1088285600_even_YY_variance_uv_arr_gridded_uvf.h5 dict to output/pyfhd_1088285600_example/healpix/uvf_grid/1088285600_even_YY_variance_uv_arr_gridded_uvf.h5, each key will be a dataset, if the key contains a dict then it will be a group.
2025-05-30 09:53:54 - INFO:
  Writing the 1088285600_even_YY_model_uv_arr_gridded_uvf.h5 dict to output/pyfhd_1088285600_example/healpix/uvf_grid/1088285600_even_YY_model_uv_arr_gridded_uvf.h5, each key will be a dataset, if the key contains a dict then it will be a group.
2025-05-30 09:53:55 - INFO:
  Writing the 1088285600_hpx_even_YY dict to output/pyfhd_1088285600_example/healpix/1088285600_hpx_even_YY.h5, each key will be a dataset, if the key contains a dict then it will be a group.
2025-05-30 09:53:57 - WARNING:
  All data flagged or cut!
2025-05-30 09:53:57 - ERROR:
  All data has been flagged
2025-05-30 09:53:57 - WARNING:
  No visibilities gridded for frequency channel [14 15] and polarization XX (0)
2025-05-30 09:53:57 - INFO:
  Writing the 1088285600_odd_XX_dirty_uv_arr_gridded_uvf.h5 dict to output/pyfhd_1088285600_example/healpix/uvf_grid/1088285600_odd_XX_dirty_uv_arr_gridded_uvf.h5, each key will be a dataset, if the key contains a dict then it will be a group.
2025-05-30 09:53:58 - INFO:
  Writing the 1088285600_odd_XX_weights_uv_gridded_uvf.h5 dict to output/pyfhd_1088285600_example/healpix/uvf_grid/1088285600_odd_XX_weights_uv_gridded_uvf.h5, each key will be a dataset, if the key contains a dict then it will be a group.
2025-05-30 09:53:59 - INFO:
  Writing the 1088285600_odd_XX_variance_uv_arr_gridded_uvf.h5 dict to output/pyfhd_1088285600_example/healpix/uvf_grid/1088285600_odd_XX_variance_uv_arr_gridded_uvf.h5, each key will be a dataset, if the key contains a dict then it will be a group.
2025-05-30 09:54:00 - INFO:
  Writing the 1088285600_odd_XX_model_uv_arr_gridded_uvf.h5 dict to output/pyfhd_1088285600_example/healpix/uvf_grid/1088285600_odd_XX_model_uv_arr_gridded_uvf.h5, each key will be a dataset, if the key contains a dict then it will be a group.
2025-05-30 09:54:02 - INFO:
  Writing the 1088285600_hpx_odd_XX dict to output/pyfhd_1088285600_example/healpix/1088285600_hpx_odd_XX.h5, each key will be a dataset, if the key contains a dict then it will be a group.
2025-05-30 09:54:04 - WARNING:
  All data flagged or cut!
2025-05-30 09:54:04 - ERROR:
  All data has been flagged
2025-05-30 09:54:04 - WARNING:
  No visibilities gridded for frequency channel [14 15] and polarization YY (1)
2025-05-30 09:54:04 - INFO:
  Writing the 1088285600_odd_YY_dirty_uv_arr_gridded_uvf.h5 dict to output/pyfhd_1088285600_example/healpix/uvf_grid/1088285600_odd_YY_dirty_uv_arr_gridded_uvf.h5, each key will be a dataset, if the key contains a dict then it will be a group.
2025-05-30 09:54:05 - INFO:
  Writing the 1088285600_odd_YY_weights_uv_gridded_uvf.h5 dict to output/pyfhd_1088285600_example/healpix/uvf_grid/1088285600_odd_YY_weights_uv_gridded_uvf.h5, each key will be a dataset, if the key contains a dict then it will be a group.
2025-05-30 09:54:06 - INFO:
  Writing the 1088285600_odd_YY_variance_uv_arr_gridded_uvf.h5 dict to output/pyfhd_1088285600_example/healpix/uvf_grid/1088285600_odd_YY_variance_uv_arr_gridded_uvf.h5, each key will be a dataset, if the key contains a dict then it will be a group.
2025-05-30 09:54:07 - INFO:
  Writing the 1088285600_odd_YY_model_uv_arr_gridded_uvf.h5 dict to output/pyfhd_1088285600_example/healpix/uvf_grid/1088285600_odd_YY_model_uv_arr_gridded_uvf.h5, each key will be a dataset, if the key contains a dict then it will be a group.
2025-05-30 09:54:08 - INFO:
  Writing the 1088285600_hpx_odd_YY dict to output/pyfhd_1088285600_example/healpix/1088285600_hpx_odd_YY.h5, each key will be a dataset, if the key contains a dict then it will be a group.
2025-05-30 09:54:09 - INFO:
  Writing the pyfhd_config dict to output/pyfhd_1088285600_example/config/pyfhd_config.h5, each key will be a dataset, if the key contains a dict then it will be a group.
2025-05-30 09:54:09 - INFO:
  pyfhd Run Completed for 1088285600
Total Runtime (Days:Hours:Minutes:Seconds.Millseconds): 0:01:33.849671
Take note of the line:
Logging and configuration file created and copied to here: /home/skywatcher/projects/pyfhd/output/pyfhd_1088285600_example
More details about the output of the pyfhd pipeline and the required inputs is clarified in the next section.
Important
The configuration used for the sample is very different to a full MWA run due to limited use of frequencies and times used in the sample data to keep it small. For a better template to base your configuration on go to _pyfhd-config-file.
The Required Inputs and the outputs of pyfhd
pyfhd only requires an observation ID to run.
pyfhd will get a default pyfhd.yaml configuration file from it’s resources
directory inside the package, so when specifying only the observation ID, it will
use the default configuration file. The default configuration is not suitable for
every observation, so it’s likely you’ll need to adjust the default configuration
file to suit your needs. Some validation is performed before and during runtime of
pyfhd to check for incompatibilities though it is not exhaustive.
Note
If you wish to use the default configuration file to do your own configurations,
from inside the repository, you can find the configuration file in the
resources directory of pyfhd, pyfhd/src/pyfhd/resources/config/pyfhd.yaml.
You can also find the default configuration file at this link here:
Note that to provide a None input in the yaml you must use ~ or null
as those are translated to None when yamls are read into python.
Some files can be discovered automatically through the input-path option of
pyfhd so read through the usage help text to work out how you wish to
configure your input. pyfhd is rather flexible on how you do your input
as many of the files you may require can be in completely separate directories.
The output of pyfhd is automatically generated and stores everything in one
directory with the name pyfhd_YYYY_MM_DD_HH_mm_ss if you don’t use the
--description option. In the case of using the --description option then
the output directory generated will be pyfhd_your_description_here. The
example run we used above uses the --description as '1088285600_example'
option so the output directory generated will be pyfhd_1088285600_example.
The path where the output directory will be generated is --output-path
(by default ./output), assuming you’re looking at the example run above,
the output directory structure will look like this:
output
└── pyfhd_1088285600_example
    ├── calibration
    │   └── 1088285600_cal.h5
    ├── checkpoints
    │   ├── 1088285600_example_calibrate_checkpoint.h5
    │   ├── 1088285600_example_gridding_checkpoint.h5
    │   └── 1088285600_example_obs_checkpoint.h5
    ├── config
    │   ├── pyfhd_1088285600_example_2025_05_30_09_52_35-final.yaml
    │   ├── pyfhd_1088285600_example_2025_05_30_09_52_35.yaml
    │   └── pyfhd_config.h5
    ├── fits
    │   ├── 1088285600_beam_XX.fits
    │   ├── 1088285600_beam_YY.fits
    │   ├── 1088285600_uniform_dirty_XX.fits
    │   ├── 1088285600_uniform_dirty_YY.fits
    │   ├── 1088285600_uniform_model_XX.fits
    │   ├── 1088285600_uniform_model_YY.fits
    │   ├── 1088285600_uniform_residual_XX.fits
    │   ├── 1088285600_uniform_residual_YY.fits
    │   ├── 1088285600_uv_weights_XX.fits
    │   └── 1088285600_uv_weights_YY.fits
    ├── gridding
    │   ├── 1088285600_image_uv.h5
    │   ├── 1088285600_model_uv.h5
    │   ├── 1088285600_uniform_filter_uv.h5
    │   ├── 1088285600_variance_uv.h5
    │   └── 1088285600_weights_uv.h5
    ├── healpix
    │   ├── 1088285600_hpx_even_XX.h5
    │   ├── 1088285600_hpx_even_YY.h5
    │   ├── 1088285600_hpx_odd_XX.h5
    │   ├── 1088285600_hpx_odd_YY.h5
    │   └── uvf_grid
    │       ├── 1088285600_even_XX_dirty_uv_arr_gridded_uvf.h5
    │       ├── 1088285600_even_XX_model_uv_arr_gridded_uvf.h5
    │       ├── 1088285600_even_XX_variance_uv_arr_gridded_uvf.h5
    │       ├── 1088285600_even_XX_weights_uv_gridded_uvf.h5
    │       ├── 1088285600_even_YY_dirty_uv_arr_gridded_uvf.h5
    │       ├── 1088285600_even_YY_model_uv_arr_gridded_uvf.h5
    │       ├── 1088285600_even_YY_variance_uv_arr_gridded_uvf.h5
    │       ├── 1088285600_even_YY_weights_uv_gridded_uvf.h5
    │       ├── 1088285600_odd_XX_dirty_uv_arr_gridded_uvf.h5
    │       ├── 1088285600_odd_XX_model_uv_arr_gridded_uvf.h5
    │       ├── 1088285600_odd_XX_variance_uv_arr_gridded_uvf.h5
    │       ├── 1088285600_odd_XX_weights_uv_gridded_uvf.h5
    │       ├── 1088285600_odd_YY_dirty_uv_arr_gridded_uvf.h5
    │       ├── 1088285600_odd_YY_model_uv_arr_gridded_uvf.h5
    │       ├── 1088285600_odd_YY_variance_uv_arr_gridded_uvf.h5
    │       └── 1088285600_odd_YY_weights_uv_gridded_uvf.h5
    ├── layout.h5
    ├── metadata
    │   ├── 1088285600_obs.h5
    │   └── 1088285600_params.h5
    ├── plots
    │   ├── calibration
    │   │   ├── 1088285600_cal_amp.png
    │   │   ├── 1088285600_cal_phase.png
    │   │   ├── 1088285600_cal_raw_amp.png
    │   │   ├── 1088285600_cal_raw_phase.png
    │   │   ├── 1088285600_cal_residual_amp.png
    │   │   └── 1088285600_cal_residual_phase.png
    │   ├── gridding
    │   │   ├── 1088285600_grid_apparent_image_XX.png
    │   │   ├── 1088285600_grid_apparent_image_YY.png
    │   │   ├── 1088285600_grid_apparent_model_XX.png
    │   │   ├── 1088285600_grid_apparent_model_YY.png
    │   │   ├── 1088285600_grid_variance_XX.png
    │   │   └── 1088285600_grid_variance_YY.png
    │   └── images
    │       ├── 1088285600_beam_XX.png
    │       ├── 1088285600_beam_YY.png
    │       ├── 1088285600_uniform_dirty_XX.png
    │       ├── 1088285600_uniform_dirty_YY.png
    │       ├── 1088285600_uniform_model_XX.png
    │       ├── 1088285600_uniform_model_YY.png
    │       ├── 1088285600_uniform_residual_XX.png
    │       └── 1088285600_uniform_residual_YY.png
    ├── pyfhd_1088285600_example_2025_05_30_09_52_35.log
    └── visibilities
        ├── 1088285600_calibrated_vis_arr.h5
        ├── 1088285600_calibrated_vis_weights.h5
        ├── 1088285600_raw_vis_arr.h5
        └── 1088285600_raw_vis_weights.h5
The difference between the final and non-final yaml is that the final yaml is
generated at the end of the run so you can observe any changes made to
pyfhd_config, the config is also saved as a HDF5 file at the end of the run.
Changes may happen due to conflicts in the options of your configuration file,
if they are minor that’s when the configuration will change and you should see
the change mentioned in the log file. Most of the directories should be self
explanatory, but there are two I wish to explain in more detail.
First the plots directory, for the plots directory, the intent is to store
all the plots generated by pyfhd in there, with a directory for plots
generated for each part of the pipeline. For example, if you wish to add diagnostic
plots for gridding as a pyfhd developer, then the policy is to create a
gridding directory in plots directory and store your plots generated from
gridding there. If the plots aren’t generated in gridding but are related
to gridding then those plots should also go into the gridding subdirectory.
The second directory I want to explain is the checkpoints directory, please
read on to the next section for this explaantion.
Checkpointing
The checkpointing system in pyfhd is designed to save the state of the
pipeline after important, potentially long running steps. The checkpoints are
stored in the checkpoints directory and they are saved at the fopllowing points:
obs_checkpoint-obsdict creation, reading of visibilities and weights, creation of theparamsdictcalibrate_checkpoint- End of calibration, creation of thecaldict which holds the calculated gains, metadata etc, the skymodel after being imported and the weights which have been updated after calibration.gridding_checkpoint- End of gridding, creation of thegriddingdict which holds the gridded visibilities and associated weights, variances, models, etc
In the case that you wish to skip a step in the pipeline, you can use the
--calibrate-checkpoint or --grid-checkpoint options to skip the calibration
or gridding steps respectively.
Attention
The --obs-checkpoint and --calibrate-checkpoint will check for each
other’s existence and if both are used --calibrate-checkpoint will be
prioritised and obs-checkpoint will be ignored.
In the below example we will run pyfhd with the --calibrate-checkpoint
option, which will skip the calibration and visibility step and go straight to
gridding.
pyfhd -c ./input/1088285600_example/1088285600_example.yaml --calibrate-checkpoint ./output/pyfhd_1088285600_example/checkpoints/1088285600_example_calibrate_checkpoint.h5 1088285600
Within the logs of the pyfhd you should see the following message:
.. code-block:: text
- yyyy-mm-dd HH:MM:SS - INFO:
Checkpoint Loaded: Calibrated and Flagged visibility parameters, array and weights, the flagged observation metadata dictionary and the calibration dictionary loaded from output/pyfhd_1088285600_example/calibrate_checkpoint.h5
Do note if you wish to use the gridding-checkpoint then you also need calibrate-checkpoint.
Configuration
We have shown that you can adjust the configuration of pyfhd using command
like arguments like --calibrate-checkpoint and -c / --config, however
we have mentioned that we used ConfigArgParse
to allow the use of YAML files. Inside the repository we have 2 examples of
configuration files, one is in the root of the repository and is the template
yaml file, pyfhd.yaml, use this to create your own configuration file.
Alternatively, you can use the example configuration file 1088285600_example.yaml
in the input/1088285600_example directory to build your configuration file.
All of these options replace the
dictionary.md
file that used in FHD, most of the options come from FHD, however some of
the options are new specific to pyfhd and some have been renamed from FHD
and in the case of being renamed, the old name is referenced inside the help
text of the option.
Most of the options are numbers, lists of numbers, strings or list of strings,
however some of the options are booleans. These booleans will have at minimum
two arguments that target the one option, one is the option itself, for example,
--silent which when used will set the silent option to True, and
--no-silent which when used will set the silent option to False.
All boolean options have the no- prefix available to you, in case you wish
to temporarily negate the options set in the configuration file via the command line.
Tip
The hierarchy of the configuration in pyfhd is as follows:
   Code
    ⬇️
Command Line
    ⬇️
   YAML
The command line argument will override the YAML file, and the code will override the command line argument in certain situations. In situations where the code overrides the command line (or YAML), it’s generally if a warning is triggered or some error is found, although we try to avoid these when we can. If no warning is logged when the code overrides the YAML or command line options, either add the warning to the code yourself and do a Pull request or open an issue on the repository.
If you wish to see all the options pyfhd has available, find them in one of
the following places:
CLI
pyfhd --help # -h also works

usage: pyfhd [-h] [-c CONFIG] [-v] [-i INPUT_PATH] [-r] [-s] [-l] [--instrument {mwa}] [--dimension DIMENSION] [--elements ELEMENTS] [--kbinsize KBINSIZE] [--FoV FOV] [--deproject_w_term DEPROJECT_W_TERM] [--conserve-memory]
            [--memory-threshold MEMORY_THRESHOLD] [--min-baseline MIN_BASELINE] [--n-pol {0,2,4}] [--save-checkpoints] [--obs-checkpoint OBS_CHECKPOINT] [--calibrate-checkpoint CALIBRATE_CHECKPOINT] [--gridding-checkpoint GRIDDING_CHECKPOINT]
            ...
Read The Docs
Go to the Usage section inside the API Documentation and you will see the full list of options available to you. The usage is generated using`sphinx <https://www.sphinx-doc.org/en/master/>`_.
Find them Here: Usage
pyfhd.pyfhd_tools.pyfhd_setup.pyfhd_parser()
You can also find the options in the pyfhd_setup.py file, this is the file
that is used to generate the command line interface and the configuration file.
Specifically look for the pyfhd_parser() function.
You can see the source here: pyfhd_parser
Downloading MWA Data
Data can be obtained via the MWA ASVO service (head to the webpage to get an account setup). There are multiple ways to download data (please refer to the MWA ASVO to learn more); here we will use the Web Dashboard as an example.
pyfhd uses a UVFITS file as input. The raw data out of the MWA telescope
comes in a bespoke format, so we must convert the data into a UVFITS file. On
the MWA ASVO, login with your credentials, then head to ‘My Jobs’ in the top
right corner, and click “New Data Job”. Select the ‘Visibility Conversion Job’
tab as shown below:
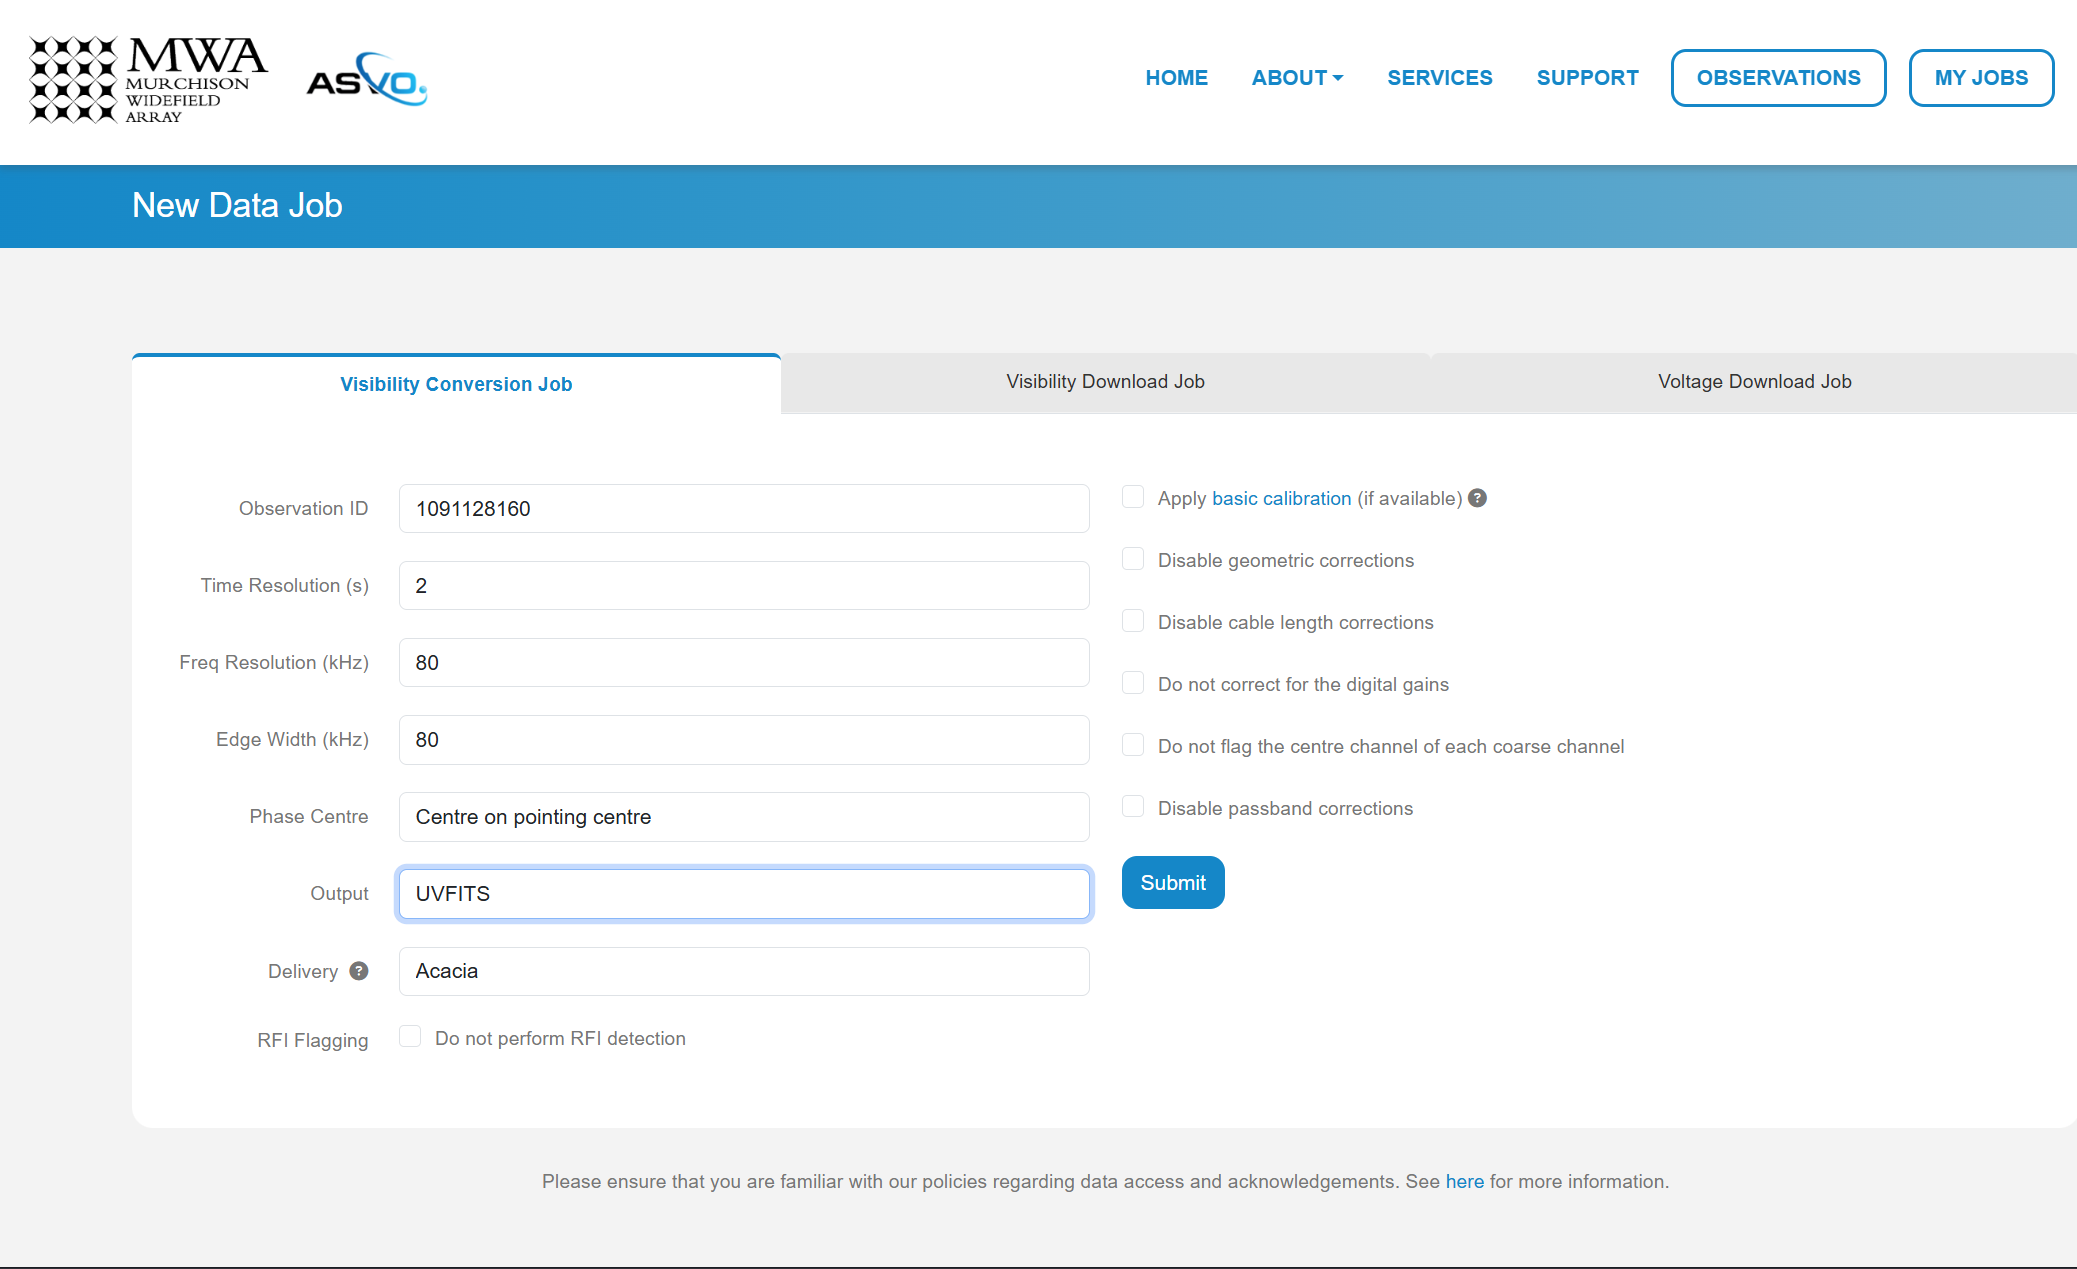
In this download we are using an observation with Observation ID
(which is the GPS time) 1091128160. We set the Time Resolution(s) to 2,
Frequency Resolution and Edge Width to 80 kHz, Phase Centre to
Centre on pointing centre and swap the ‘Output’ format to UVFITS.
Click Submit to launch the job.
Tip
If you change these values for time resolution, frequency resolution and/or edge width double check your skymodel is using the same parameters.
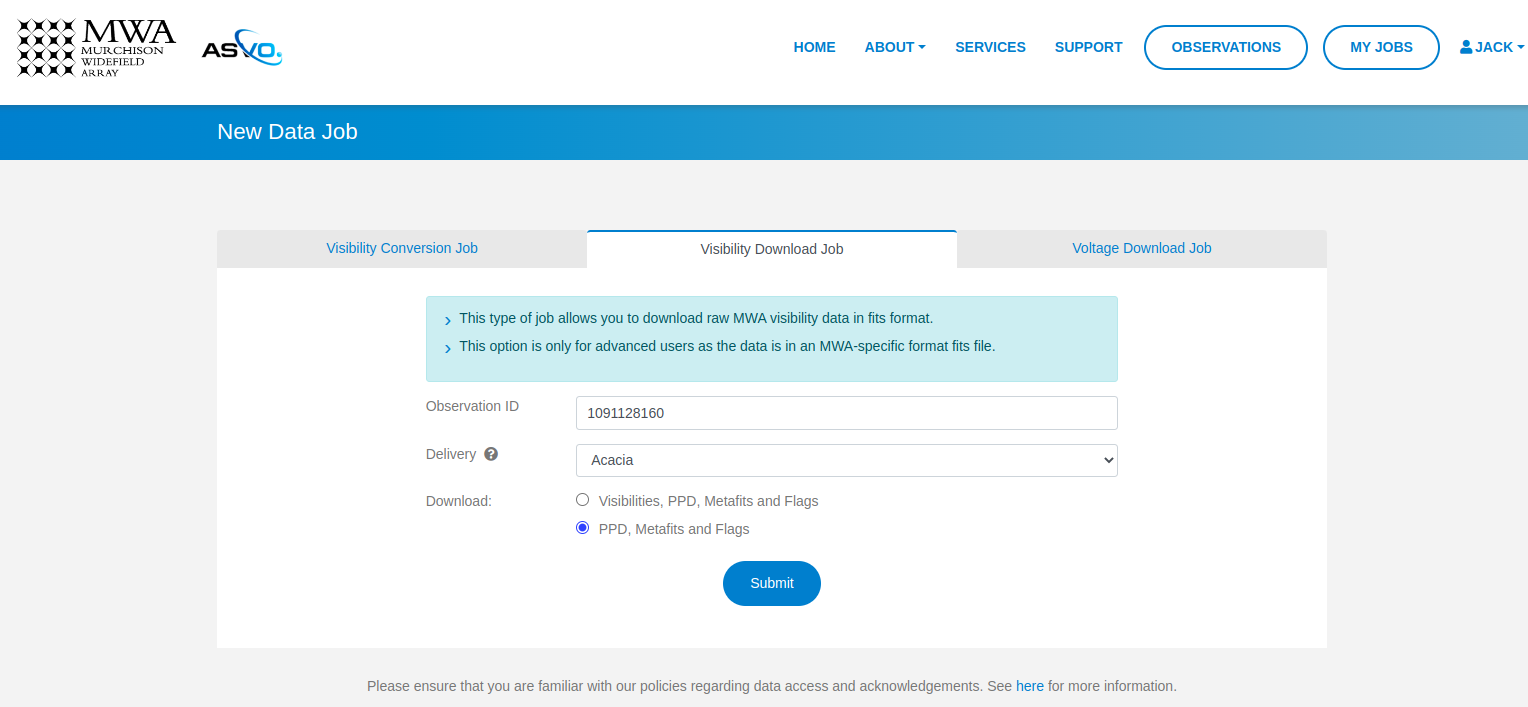
We also need a metafits tile, which we can access via the ‘Visibility Download Job’ tab. Input the Obs ID, and be sure to click the ‘PPD, Metafits, and Flags’ option like below (otherwise you download the raw data as well, which we don’t need):
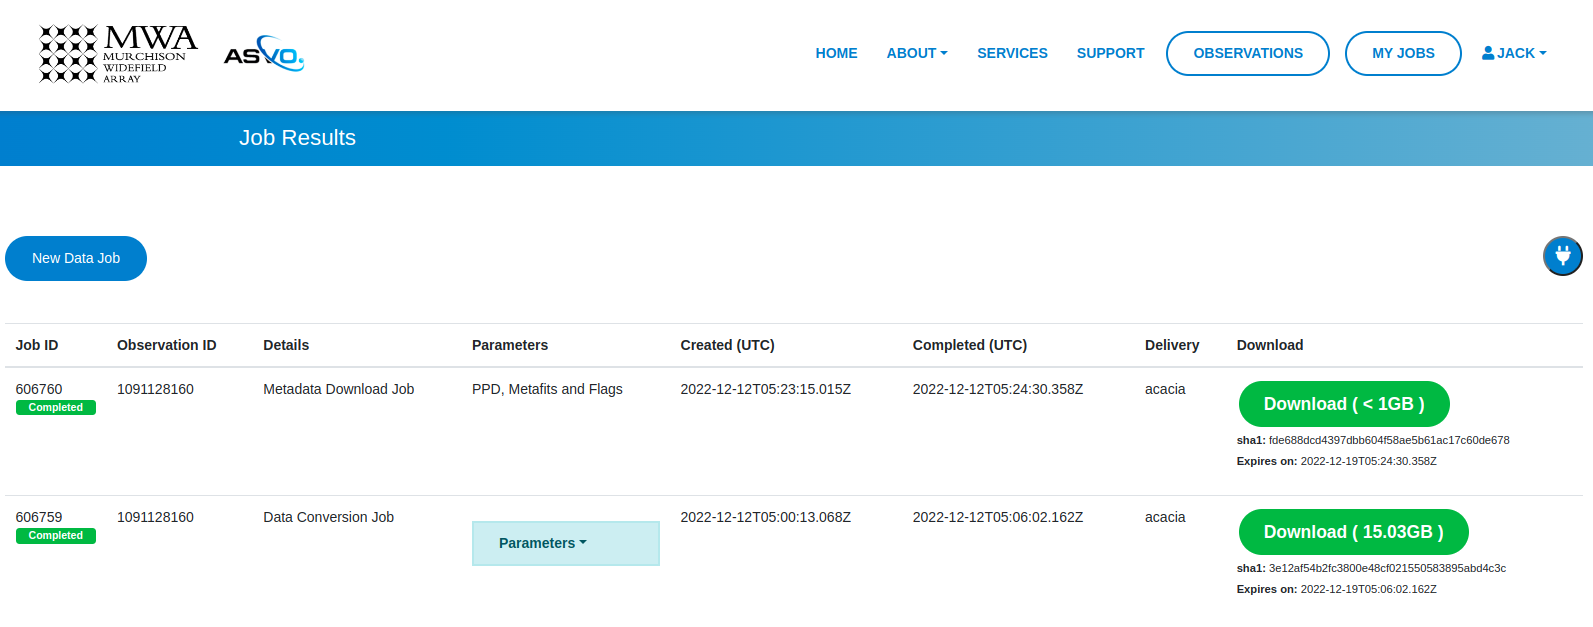
You can check the status of your download by clicking ‘My Jobs’ in the top left.Once they are ready to download, you’ll see something like:
Getting the tutorial data
For the data we use for the full MWA observations you can download the required files from here:
Each directory is an observation, and inside each directory it will contain the following files:
<obs_id>.uvfits- The UVFITS file for the observation<obs_id>.metafits- The MWA metafits file for the observationpuma_LoBES_2s_80kHz_hbeam_<obs_id>.uvfits- The model visibilities generated by WODEN for the observation
Separately, there will be a beam file decomp_beam_pointing0.h5 which is the
beam file for an observation at pointing 0 for MWA. The beam file is used for
gridding, and isn’t required for calibration.
Calibration
Calibration is fully available in pyfhd and can be enabled using the
--calibrate-visibilities option being set to true. Most of the options for
calibration are found under the
Calibration group in the argument parser.
The first example we’ll do is the a calibration of the sample data using only
the command line interface to show the options that changed
in comparison to the template in the root of the repository (which will be used
by default here).
Running calibration on the sample data
Tip
This assumes you have retrieved the sample data and have it the directory
input/1088285600_example/. If you haven’t retrieved the sample data,
please refer to the section above on how to get the Sample Data.
pyfhd \
  --input-path "./input/1088285600_example/" \
  --saved-beam-file-path "./input/1088285600_example/gauss_beam_pointing0_167635008Hz.h5" \
  --beam-offset-time 0 \
  --no-cable-bandpass-fit \
  --no-cal-reflection-hyperresolve \
  --cal-reflection-mode-theory 0 \
  --no-calibration-auto-initialize \
  --no-vis-baseline-hist \
  --no-digital-gain-jump-polyfit \
  --cal-stop \
  --no-flag-frequencies \
  --description "1088285600_example_cal_stop" \
  --model-file-type "uvfits" \
  --model-file-path "./input/1088285600_example/1088285600_model.uvfits" \
  --calibration-plots \
  --gridding-plots \
  --image-plots \
  1088285600
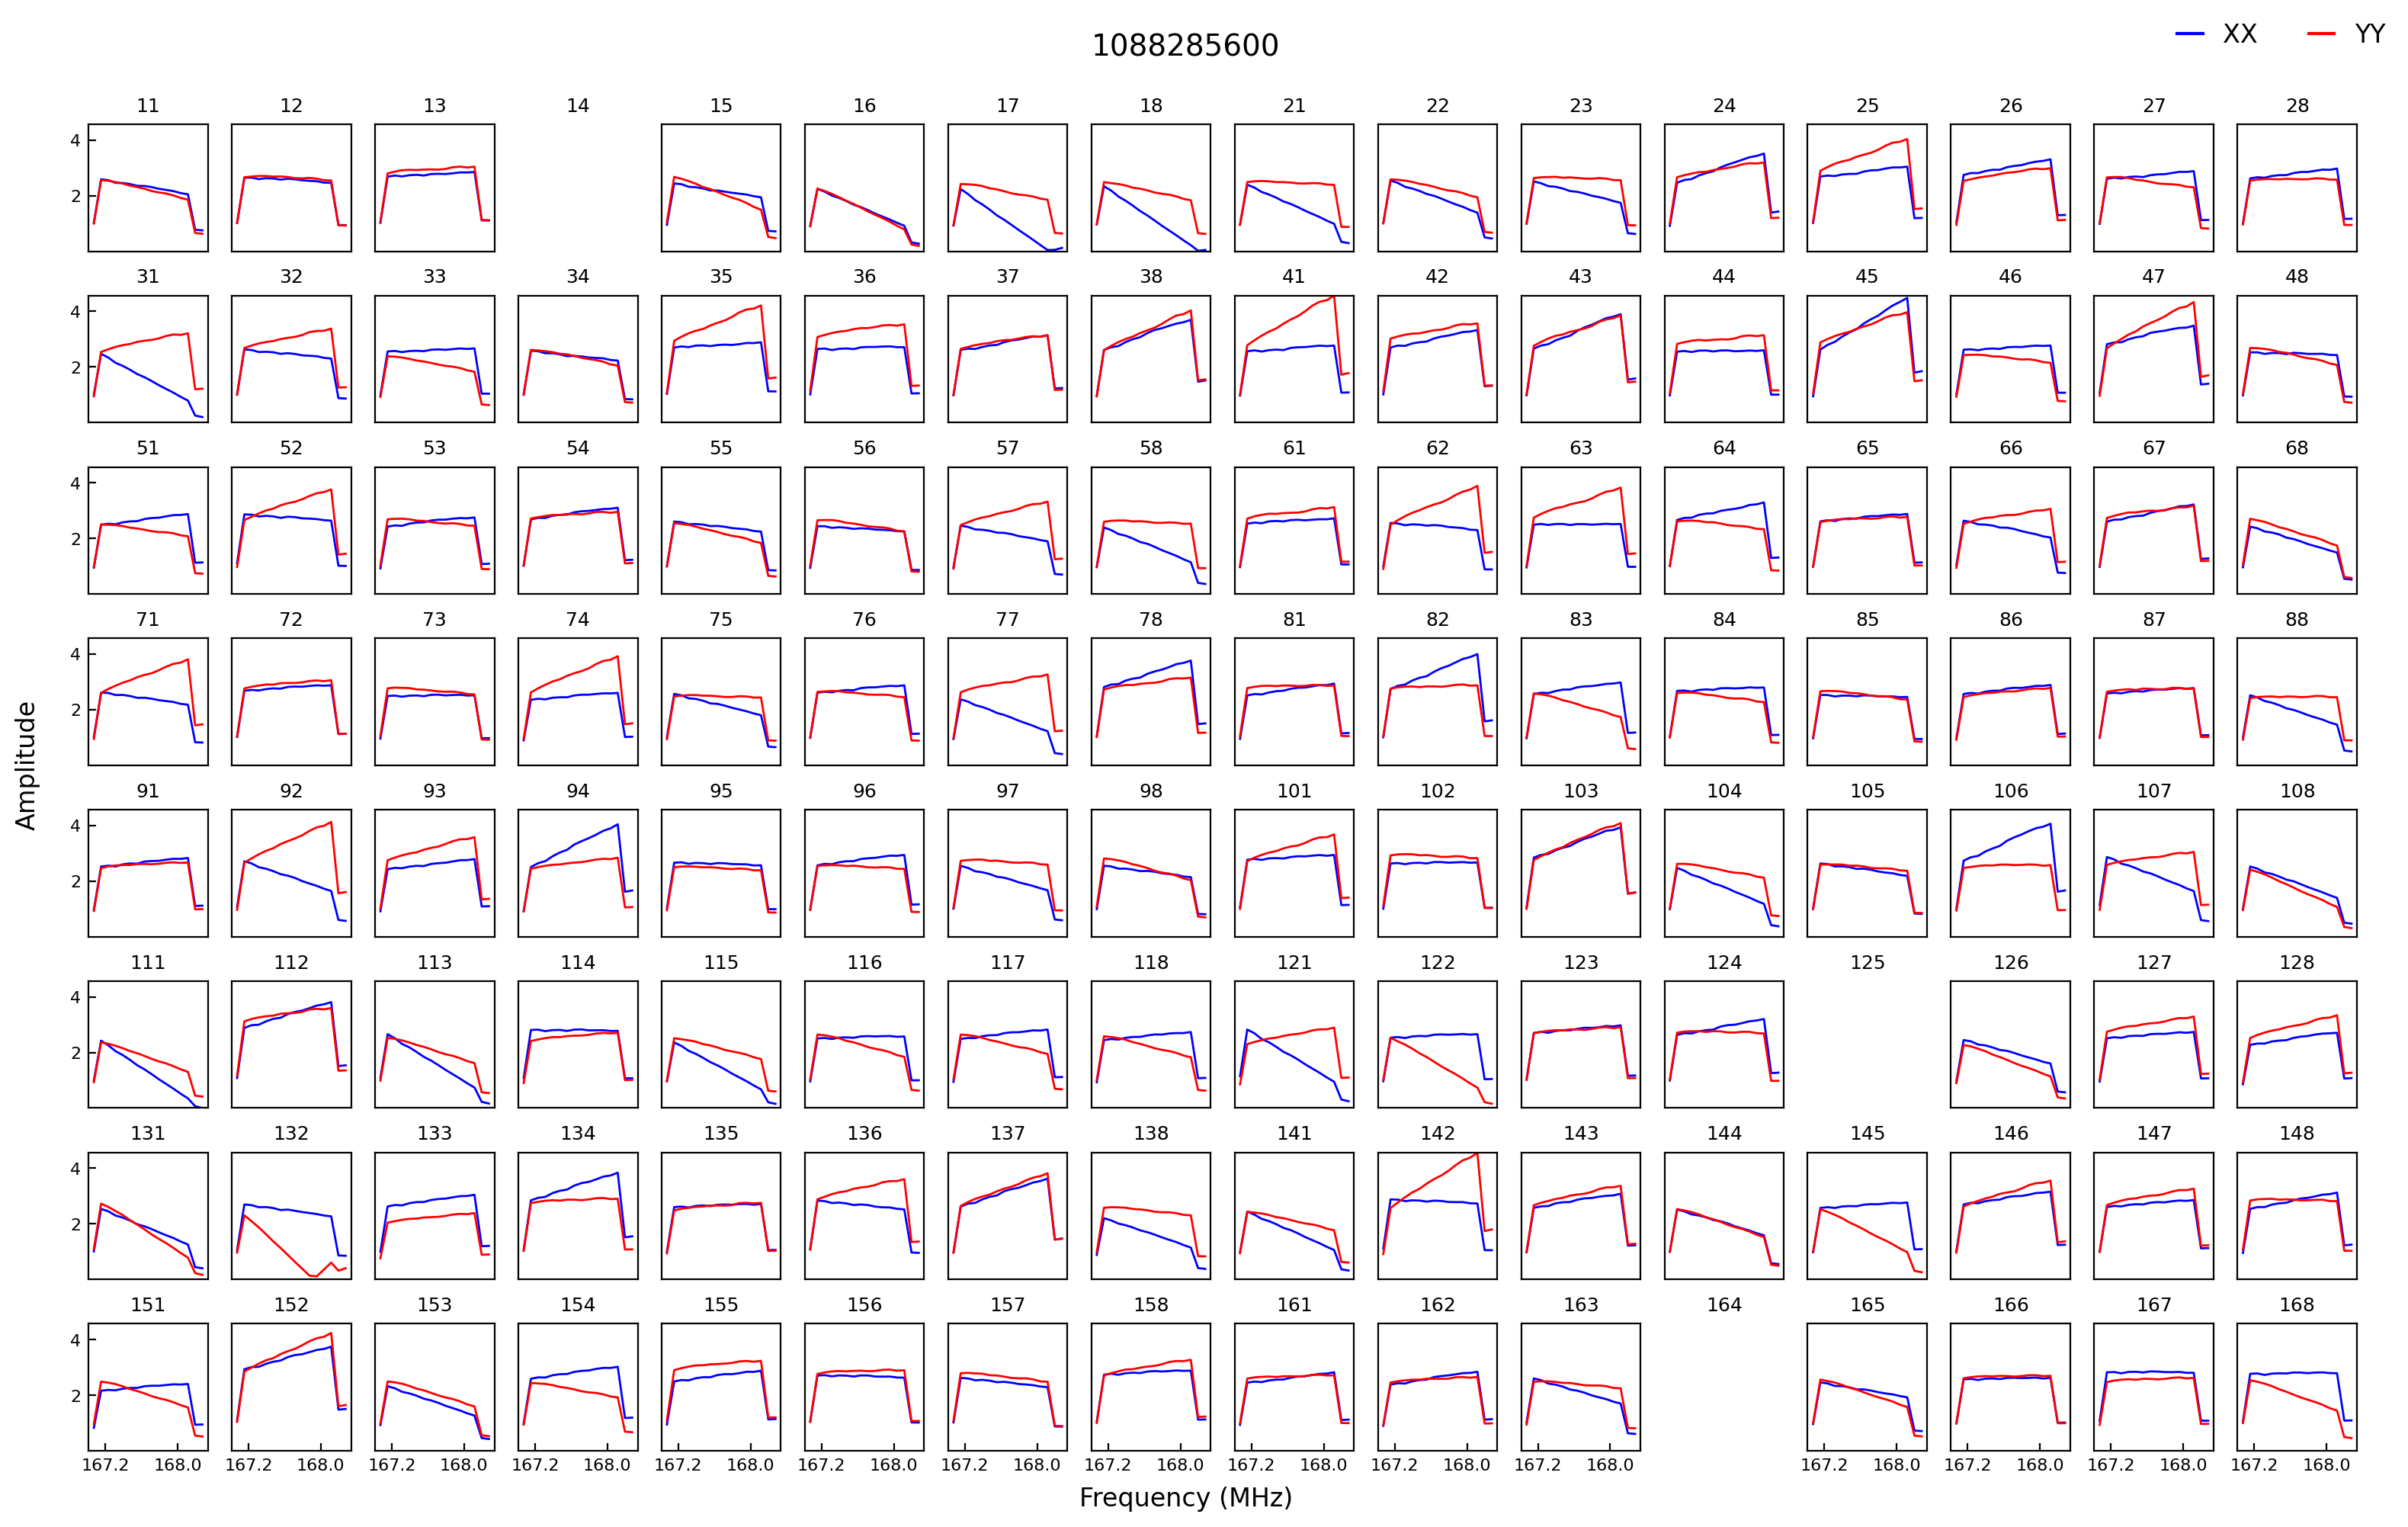
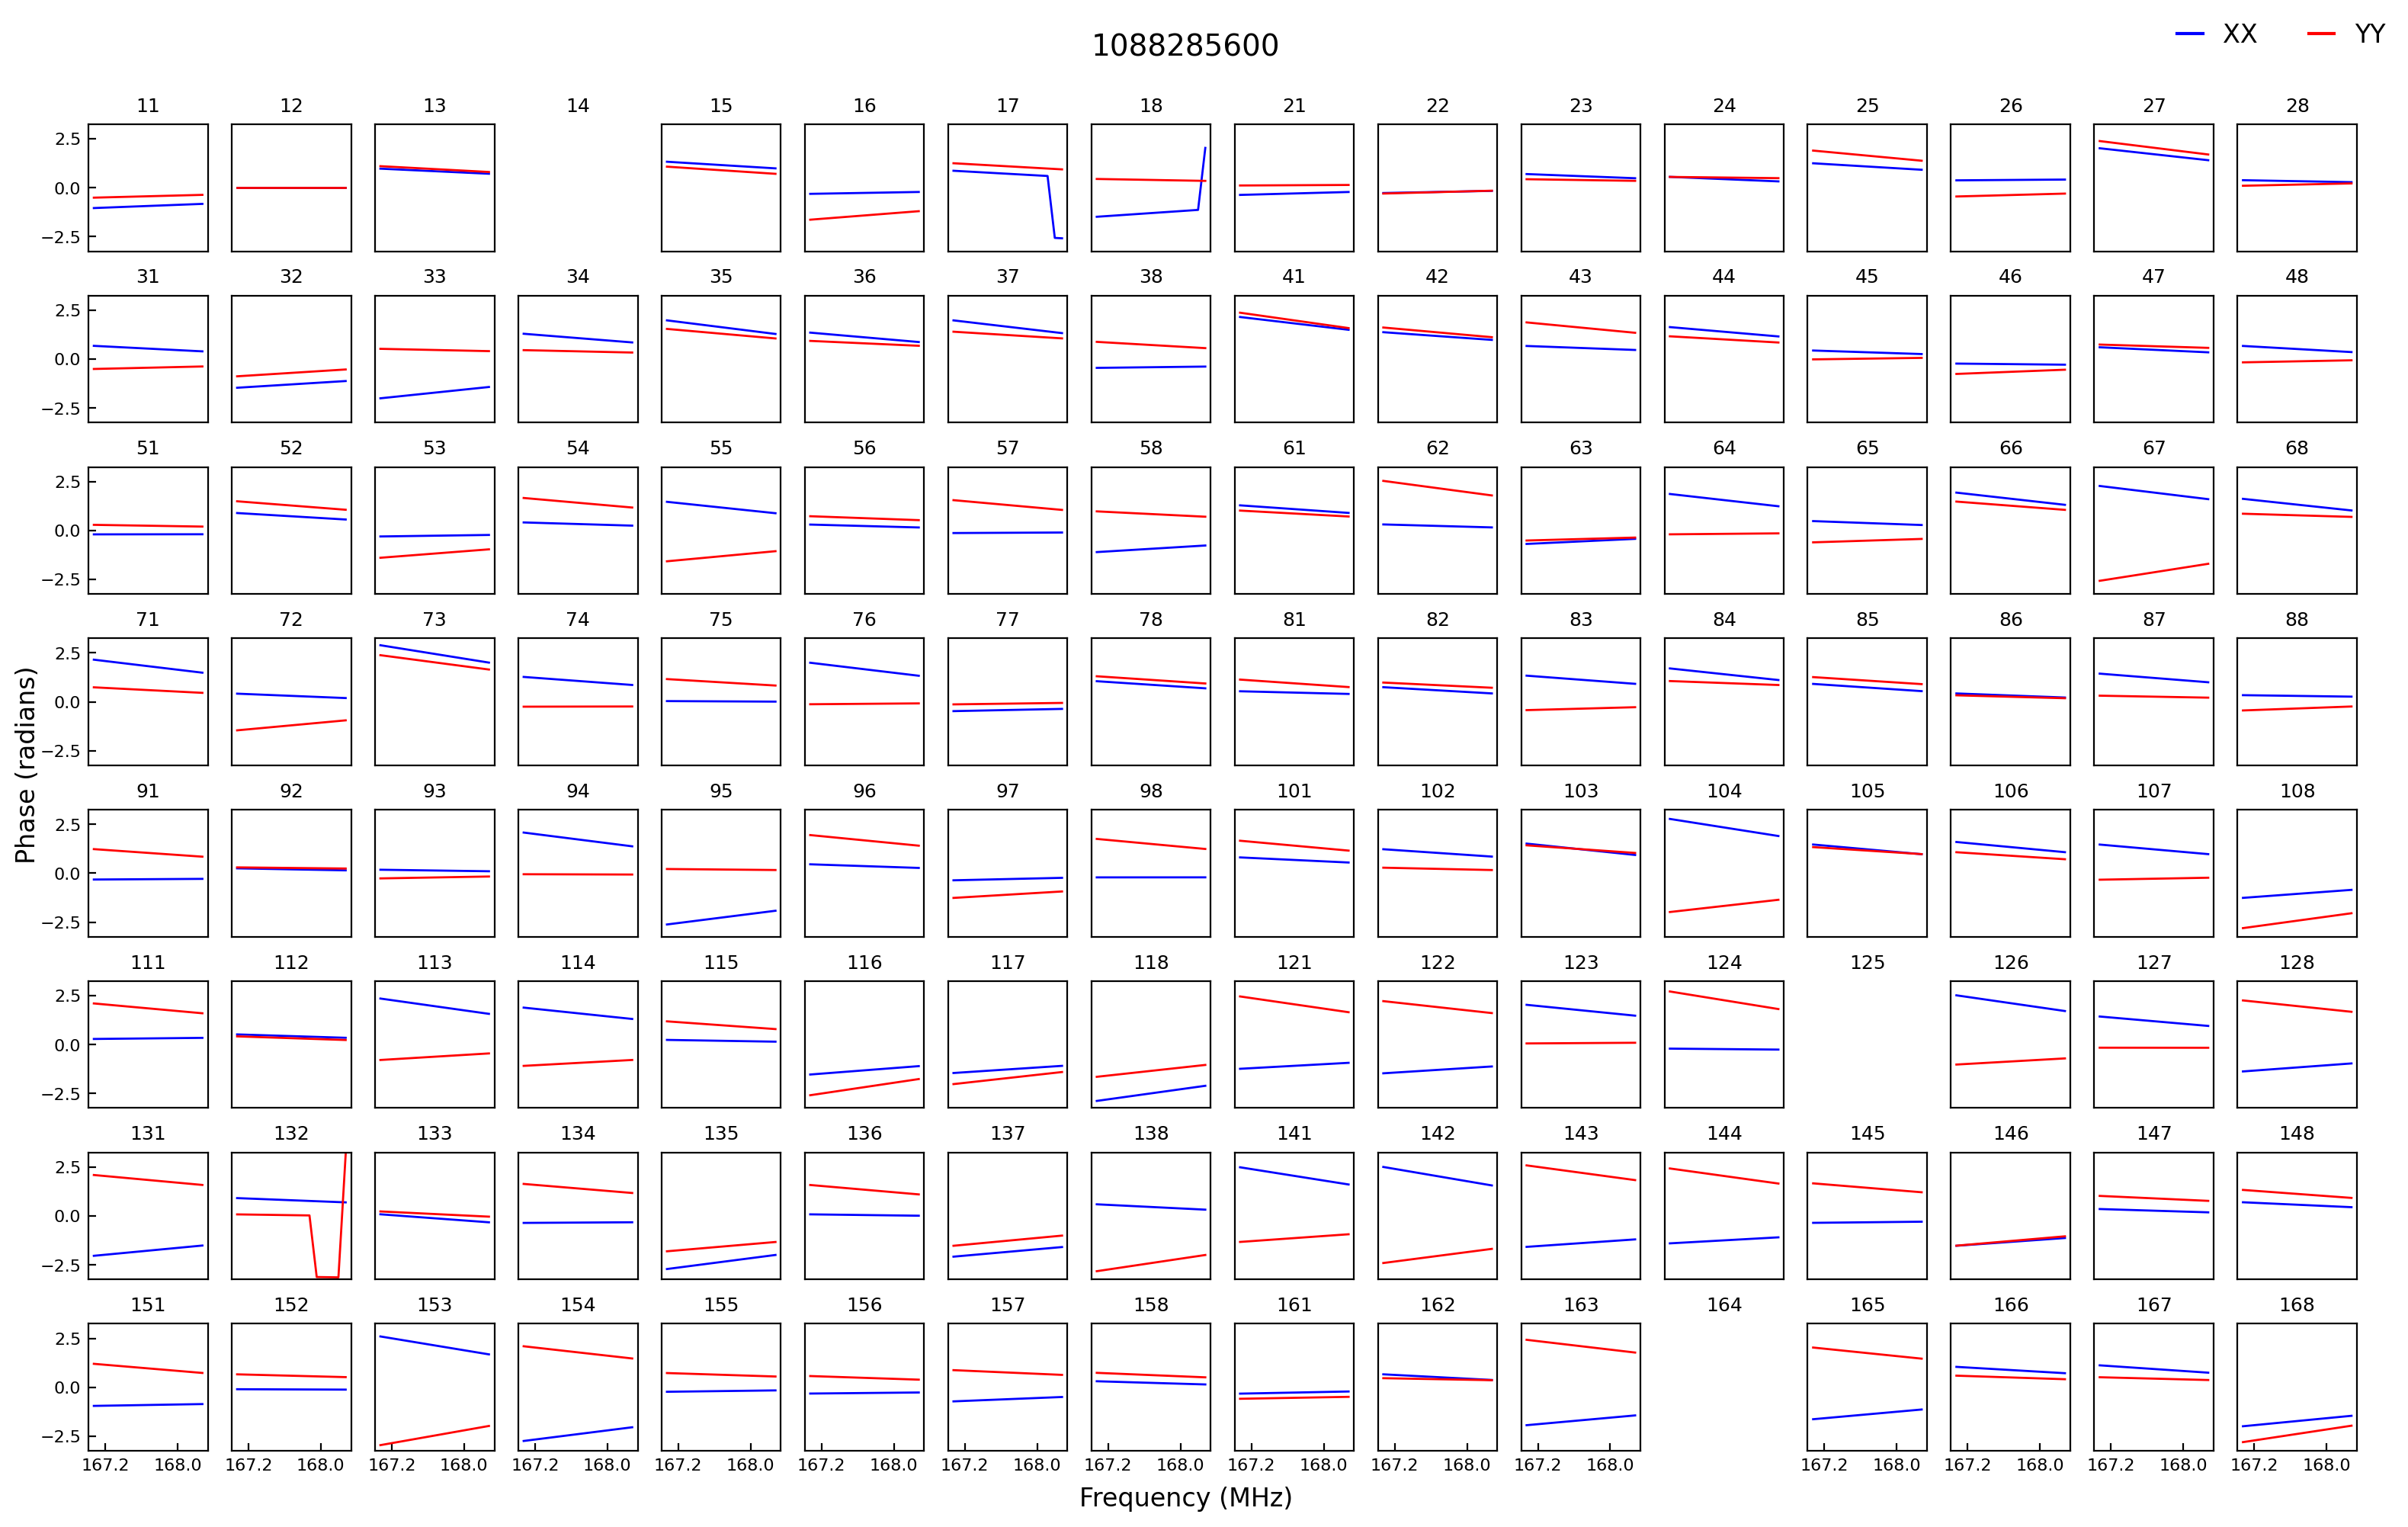
Here you some some solutions from the calibration of the sample data:
Running calibration on a full MWA observation
For this observation I put everything inside the /place/for/input directory
under uvfits, models and beams sub-directories.
The input visibility data is inside the uvfits directory, the model generated
by WODEN is inside the models directory and the beam is inside the beams
directory (not that we need it for this run, as we use --cal-stop to stop
pyfhd after calibration).
pyfhd \
    1091128160 \
    --input-path=/path/to/input/uvfits/1091128160 \
    --calibrate-visibilities \
    --cable-bandpass-fit \
    --calibration-polyfit \
    --cal-amp-degree-fit 2 \
    --cal-phase-degree-fit 1 \
    --cal-reflection-hyperresolve \
    --cal-reflection-mode-theory=150 \
    --no-cal-reflection-mode-delay \
    --no-cal-reflection-mode-file \
    --no-calibration-auto-fit \
    --no-calibration-auto-initialize \
    --no-cal-adaptive-calibration-gain \
    --vis-baseline-hist \
    --bandpass-calibrate \
    --auto-ratio-calibration \
    --no-cal-time-average \
    --no-digital-gain-jump-polyfit \
    --calibration-plots \
    --cal-stop \
    --output-path "/path/to/output/" \
    --description 1091128160 \
    --model-file-type "uvfits" \
    --model-file-path "/path/to/input/models/1091128160/puma_LoBES_2s_80kHz_hbeam_1091128160.uvfits" \
    --saved-beam-file-path "/path/to/beams/decomp_beam_pointing0.h5" \
    --lazy-load-beam
Tip
The full configuration file to set all the options in the above command can be seen below
1091128160.yaml
# Default Arguments for pyfhd
# ~ returns None in Python (i.e. NULL)
input-path : '/path/to/input/uvfits/1091128160'
recalculate-all : false
silent : false
log-file : true
conserve-memory : false
instrument : 'mwa'
memory-threshold : 100000000
dimension : 2048
elements : 2048
kbinsize : 0.5
FoV : ~
min-baseline : 1.
n-pol : 2
deproject-w-term : ~

# Checkpointing
save-checkpoints: false
obs-checkpoint: ~
calibrate-checkpoint: ~
gridding-checkpoint: ~

# Instrument
override-target-phasera: ~
override-target-phasedec: ~

# Beam Setup
saved-beam-file-path: /path/to/beams/decomp_beam_pointing0.h5
lazy-load-beam: true
recalculate-beam : true
beam-clip-floor : true
interpolate-kernel : true
beam-nfreq-avg : 16
psf-dim: 54
psf-resolution : 100
beam-mask-threshold: 100
beam-model-version : 2
beam-offset-time : 0
beam-per-baseline: false

# Calibration
calibrate-visibilities : true
cable-bandpass-fit : true # Depends on instrument cable length text file
cal-bp-transfer : ~
calibration-polyfit : true
allow-sidelobe-cal-sources : true
cal-amp-degree-fit : 2
cal-phase-degree-fit : 1
cal-reflection-hyperresolve : true
cal-reflection-mode-theory : 150
cal-reflection-mode-delay : false
cal-reflection-mode-file : false
calibration-auto-fit: false
calibration-auto-initialize: false
cal-gain-init: 1
cal-convergence-threshold: 1e-7
cal-adaptive-calibration-gain: false
cal-base-gain: ~ # This is set to None by default to set the default based on cal-adaptive-calibration-gain as per FHD
cal-phase-fit-iter: 4
min-cal-baseline : 50.
vis-baseline-hist : true
bandpass-calibrate : true
auto-ratio-calibration: true
cal-time-average: false
digital-gain-jump-polyfit: false
return-cal-visibilities : true
calibration-flag-iterate : 0
diffuse-calibrate : ~
calibration-catalog-file-path  :  ~ # 'GLEAM_v2_plus_rlb2019.sav' (FHD Default)
transfer-calibration : ~
cal-stop : true
transfer-model-uv : ~
max-cal-iter: 100

# Flagging
flag-basic: true
flag-freq-start : ~
flag-freq-end : ~
flag-tiles: []
flag-frequencies: false
flag-model: true
flag-calibration : true
flag-calibration-frequencies: false
flag-visibilities : false
transfer-weights : ~
time-cut: ~

# Gridding
recalculate-grid : true
image-filter : 'filter_uv_uniform'
mask-mirror-indices: false
grid-spectral: false
grid-weights: true
grid-variance: true
grid-uniform: false

# Deconvolution
# deconvolve : false
# max-deconvolution-components : 20000
# filter-background : true
# smooth-width : 32
dft-threshold : true
# return-decon-visibilities : false
# deconvolution-filter : 'filter_uv_uniform'

# Export
output-path : '/path/to/output'
export-images : true
save-obs: true
save-params: true
save-cal: true
save-visibilities : false
save-weights: false
save-healpix-fits: false
snapshot-healpix-export : false
pad-uv-image : 1.
ring-radius-multi : 10.
description : 1091128160

# Plotting
calibration-plots: true
gridding-plots: true
image-plots: true

# Model
# Current choices of model-file-type are sav and uvfits
model-file-type : 'uvfits'
# If you set model-file-type to uvfits, set import-model-uvfits to the
# (ideally absolute) path of the fits file
# If model-file-type is set to sav then it will look for the sav files as
# said in the function import_vis_model_from_sav
model-file-path: '/path/to/models/1091128160/puma_LoBES_2s_80kHz_hbeam_1091128160.uvfits'
diffuse-model : ~
model-catalog-file-path  :  ~ # 'GLEAM_v2_plus_rlb2019.sav' (FHD Default)
allow-sidelobe-model-sources : false

# Simulation
# run-simulation : false
# in-situ-sim-input : ~
# eor-vis-filepath : ~
# enhance-eor : 1
# sim-noise : ~
# tile-flag-list : ~
# remove-sim-flags : false

# HEALPIX
ps-kbinsize : 0.5
ps-kspan : 200
ps-beam-threshold: 0
ps-fov: ~
ps-dimension: ~
ps-degpix: ~
ps-nfreq-avg: ~
ps-tile-flag-list: []
n-avg : 2
rephase-weights: True
restrict-healpix-inds : true
healpix-inds: ~
split-ps-export : true
Note
On a system with 20 cores (AMD Ryzen 5900X) this command took around 31 minutes to run.
If you look in the /path/to/output/pyfhd_1091128160/plots/calibration you
will find plots including the calibration amplitude and phases:
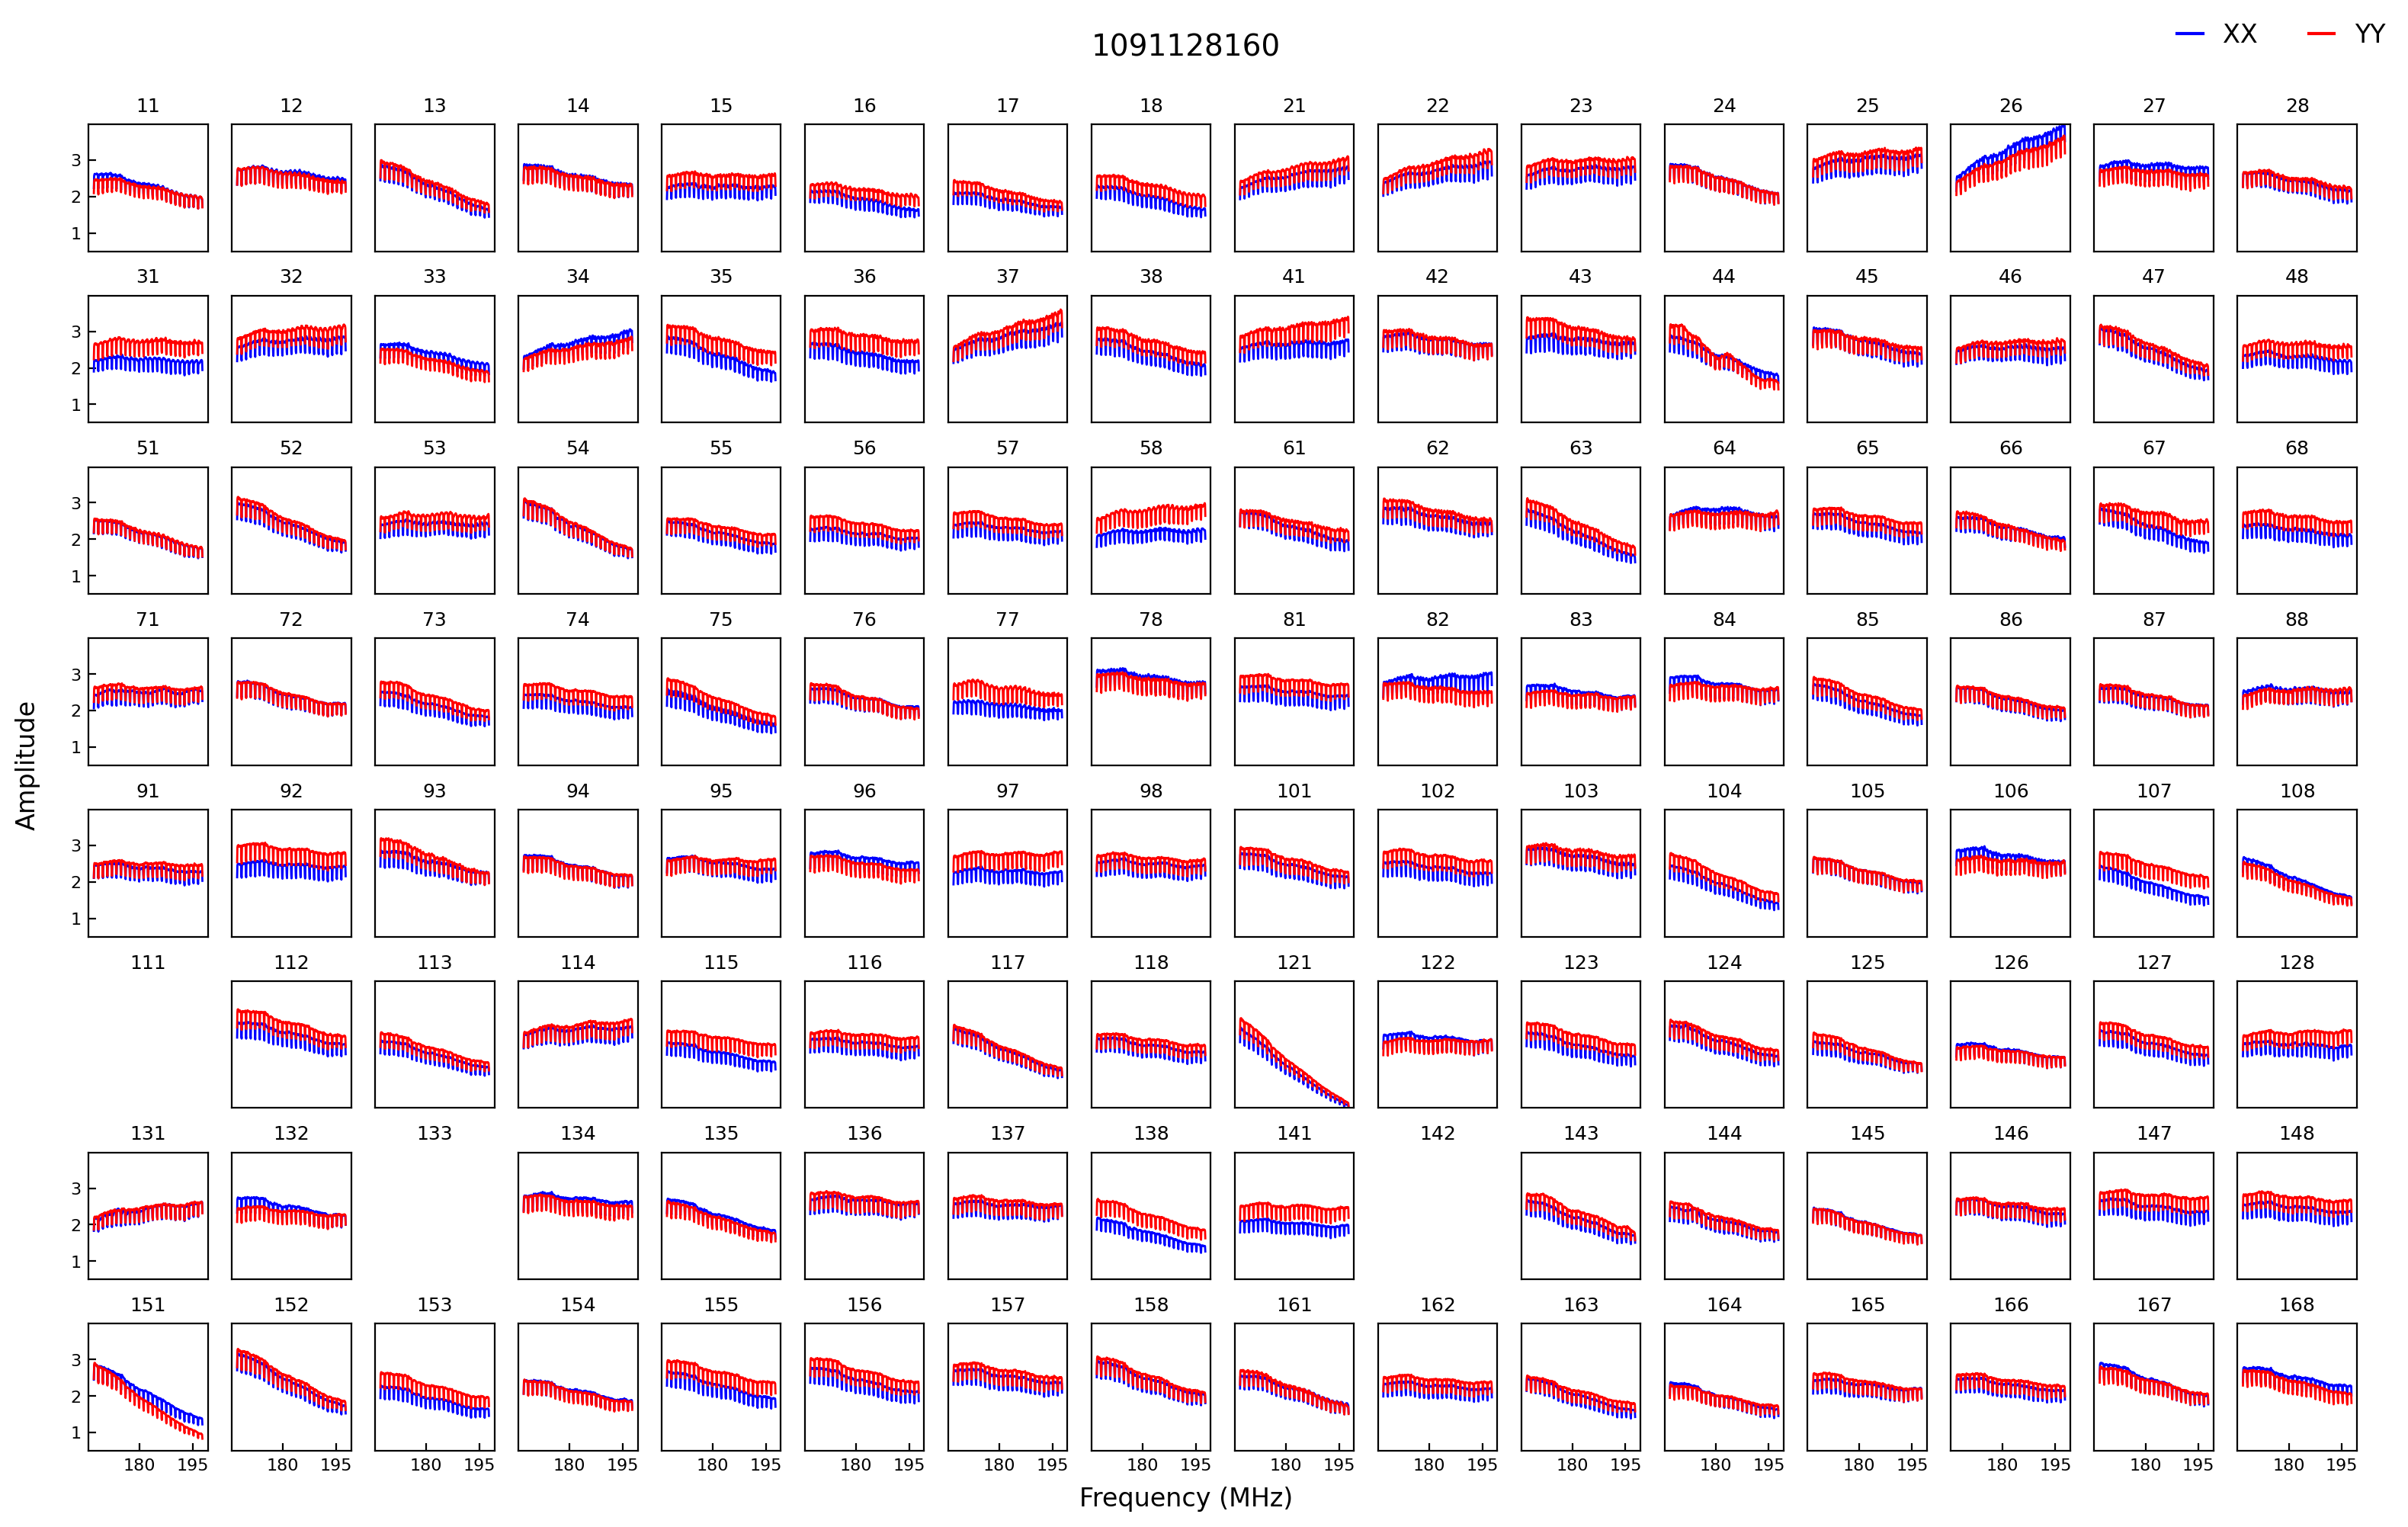
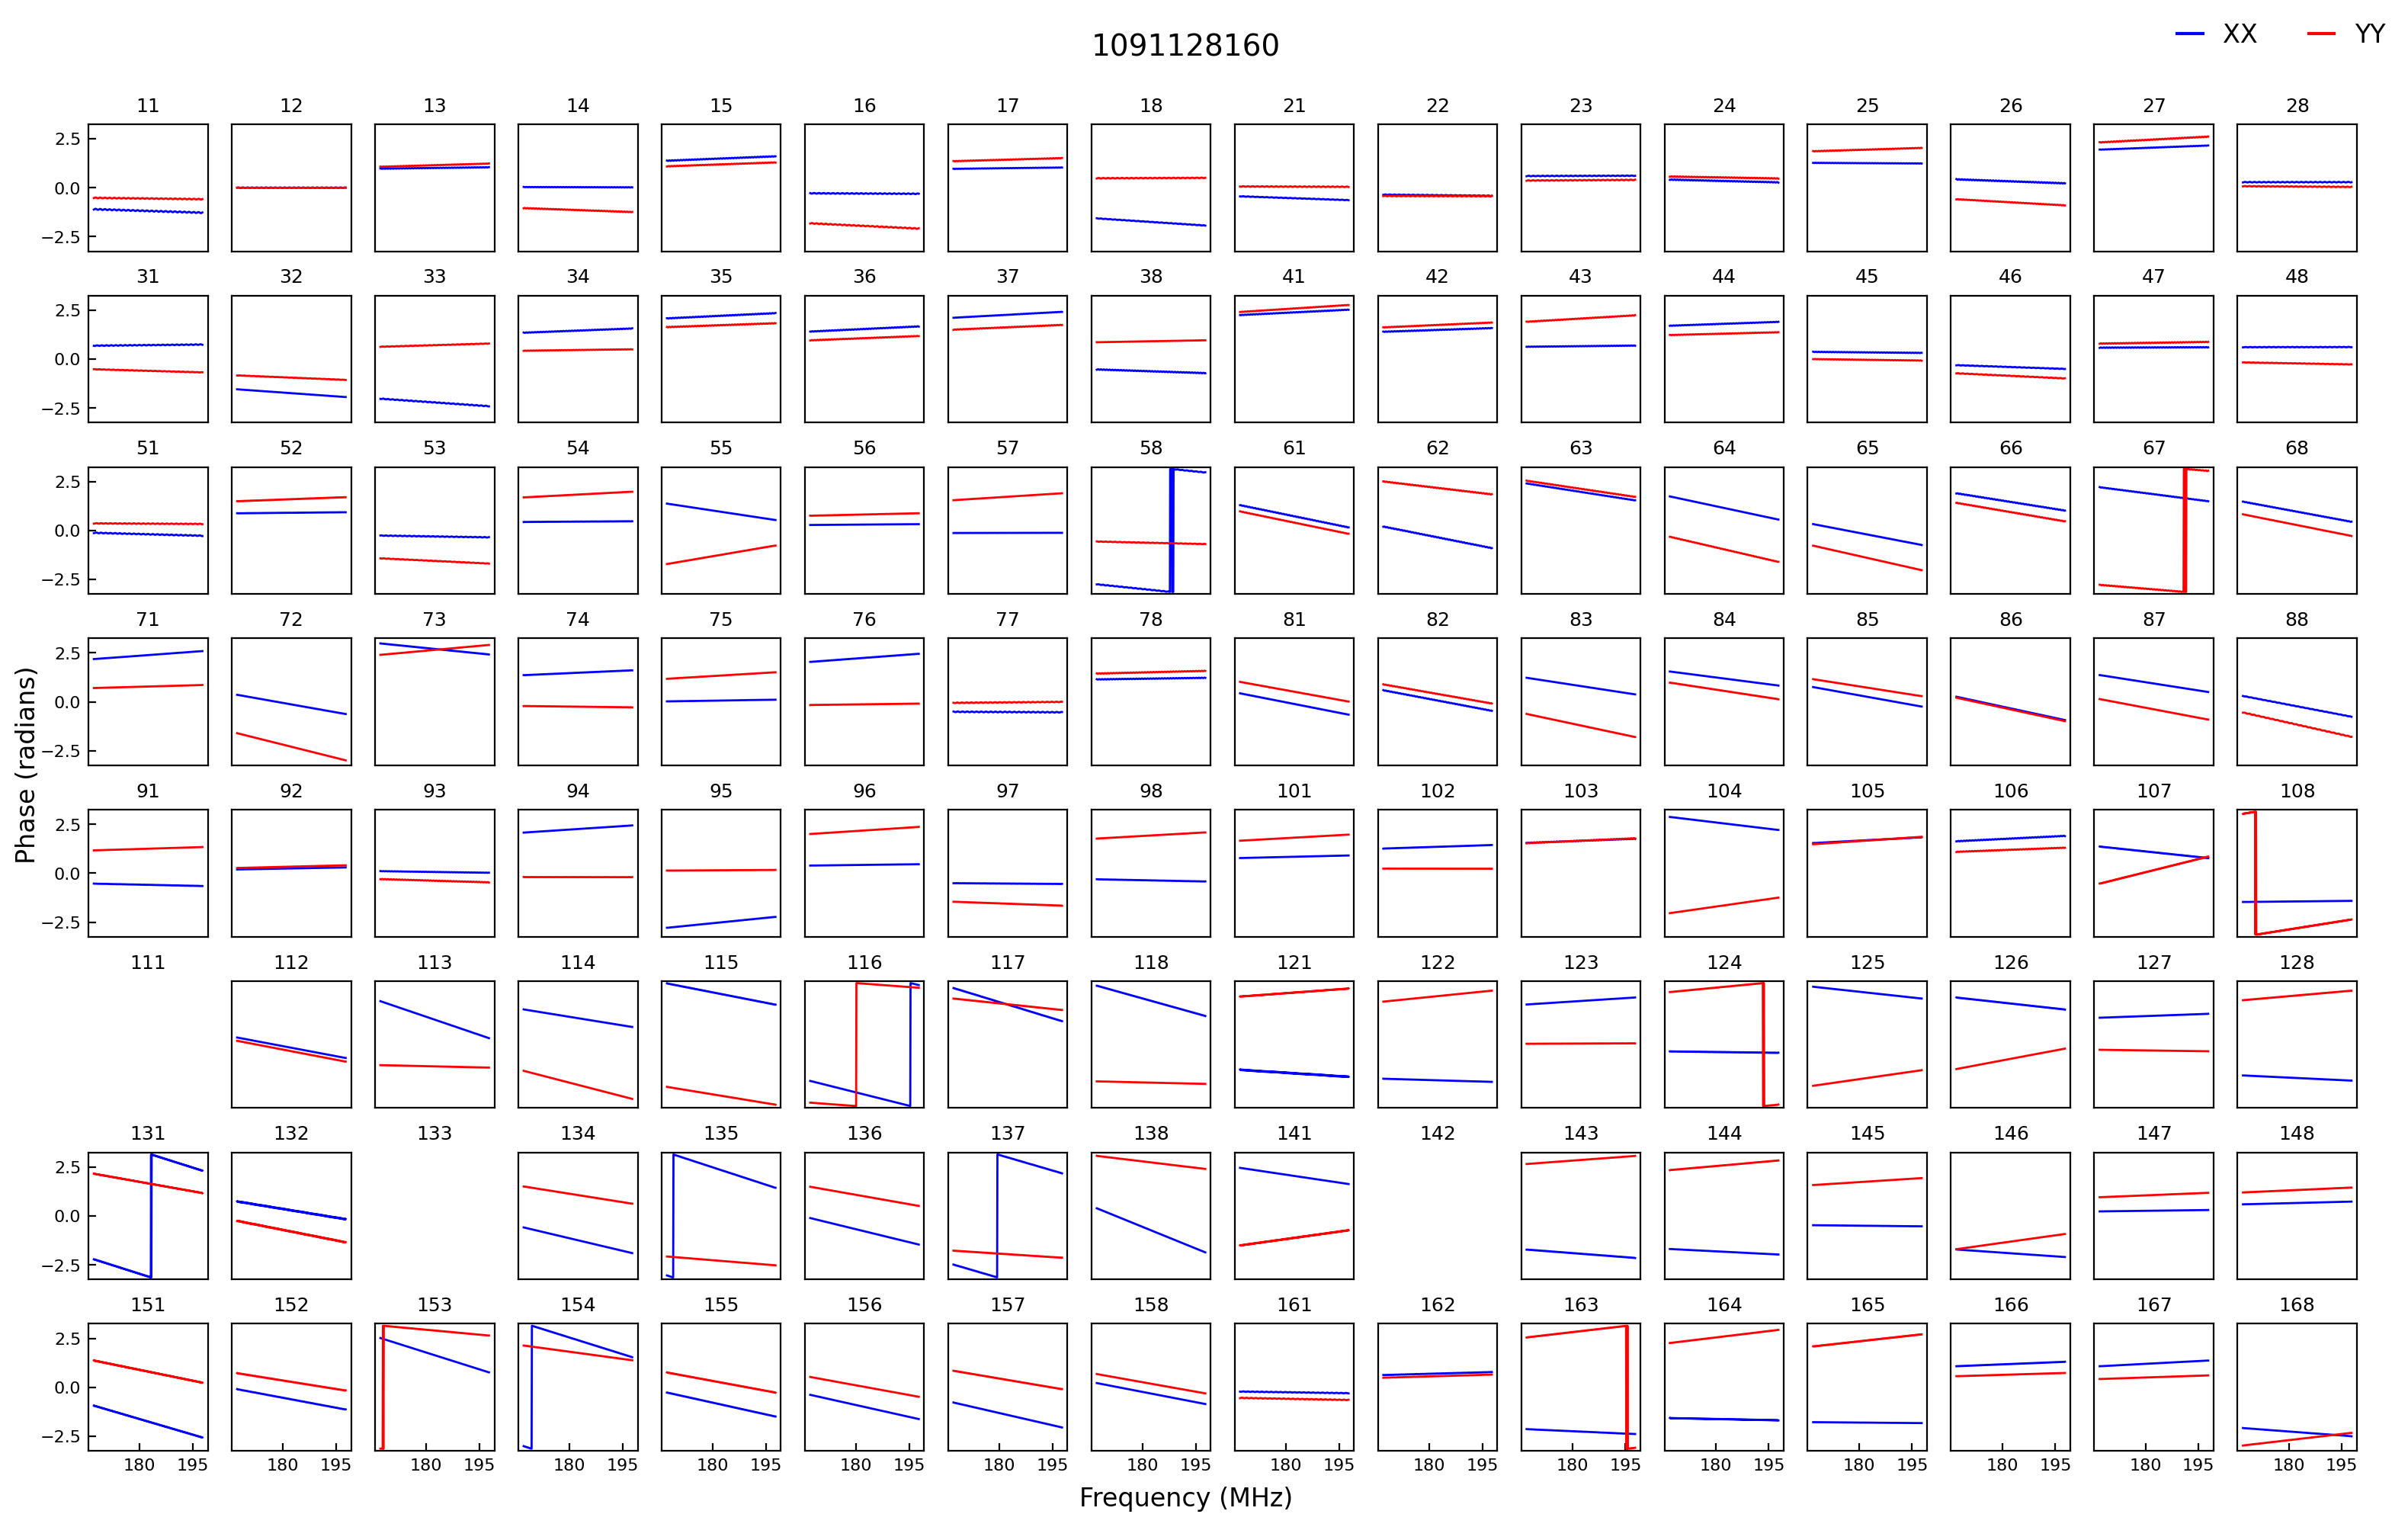
We have solutions!
Gridding
Note
Performing gridding in pyfhd, requires you to import a beam, the beams that
are currently supported are those generated by FHD, however, pyfhd
has nothing currently to do the beam forming (although work has been done on
this checkout Beam Setup <Beam Setup_>). Reading in a sav file is done using
scipy.io.readsav and the beam is converted to a numpy complex array, however
for large beams this can take a long time and can use a lot of memory,
so it should only be done once. pyfhd will save convert any beam sav
file into a HDF5 file, in the same location as the sav file.
Running the gridding step in pyfhd is relatively simple as its enabled by
default, and the small number of options available to you are found in the
Gridding
section of the argument parser.
Running Gridding with the sample data
We’ll use the calibrate-checkpoint example earlier to run it
pyfhd -c ./input/1088285600_example/1088285600_example.yaml --calibrate-checkpoint ./output/pyfhd_1088285600_example/checkpoints/1088285600_example_calibrate_checkpoint.h5 1088285600
This would be the same as runnning the command below:
pyfhd \
  --input-path "./input/1088285600_example/" \
  --description "1088285600_gridding_example" \
  --saved-beam-file-path "./input/1088285600_example/gauss_beam_pointing0_167635008Hz.h5" \
  --calibrate-checkpoint "./output/pyfhd_1088285600_example/checkpoints/1088285600_example_calibrate_checkpoint.h5" \
  --recalculate-grid \
  --image-filter 'filter_uv_uniform' \
  --no-mask-mirror-indices \
  --no-grid-spectral \
  --grid-weights \
  --grid-variance \
  --no-grid-uniform \
  --gridding-plots \
  --no-snapshot-healpix-export \
  1088285600
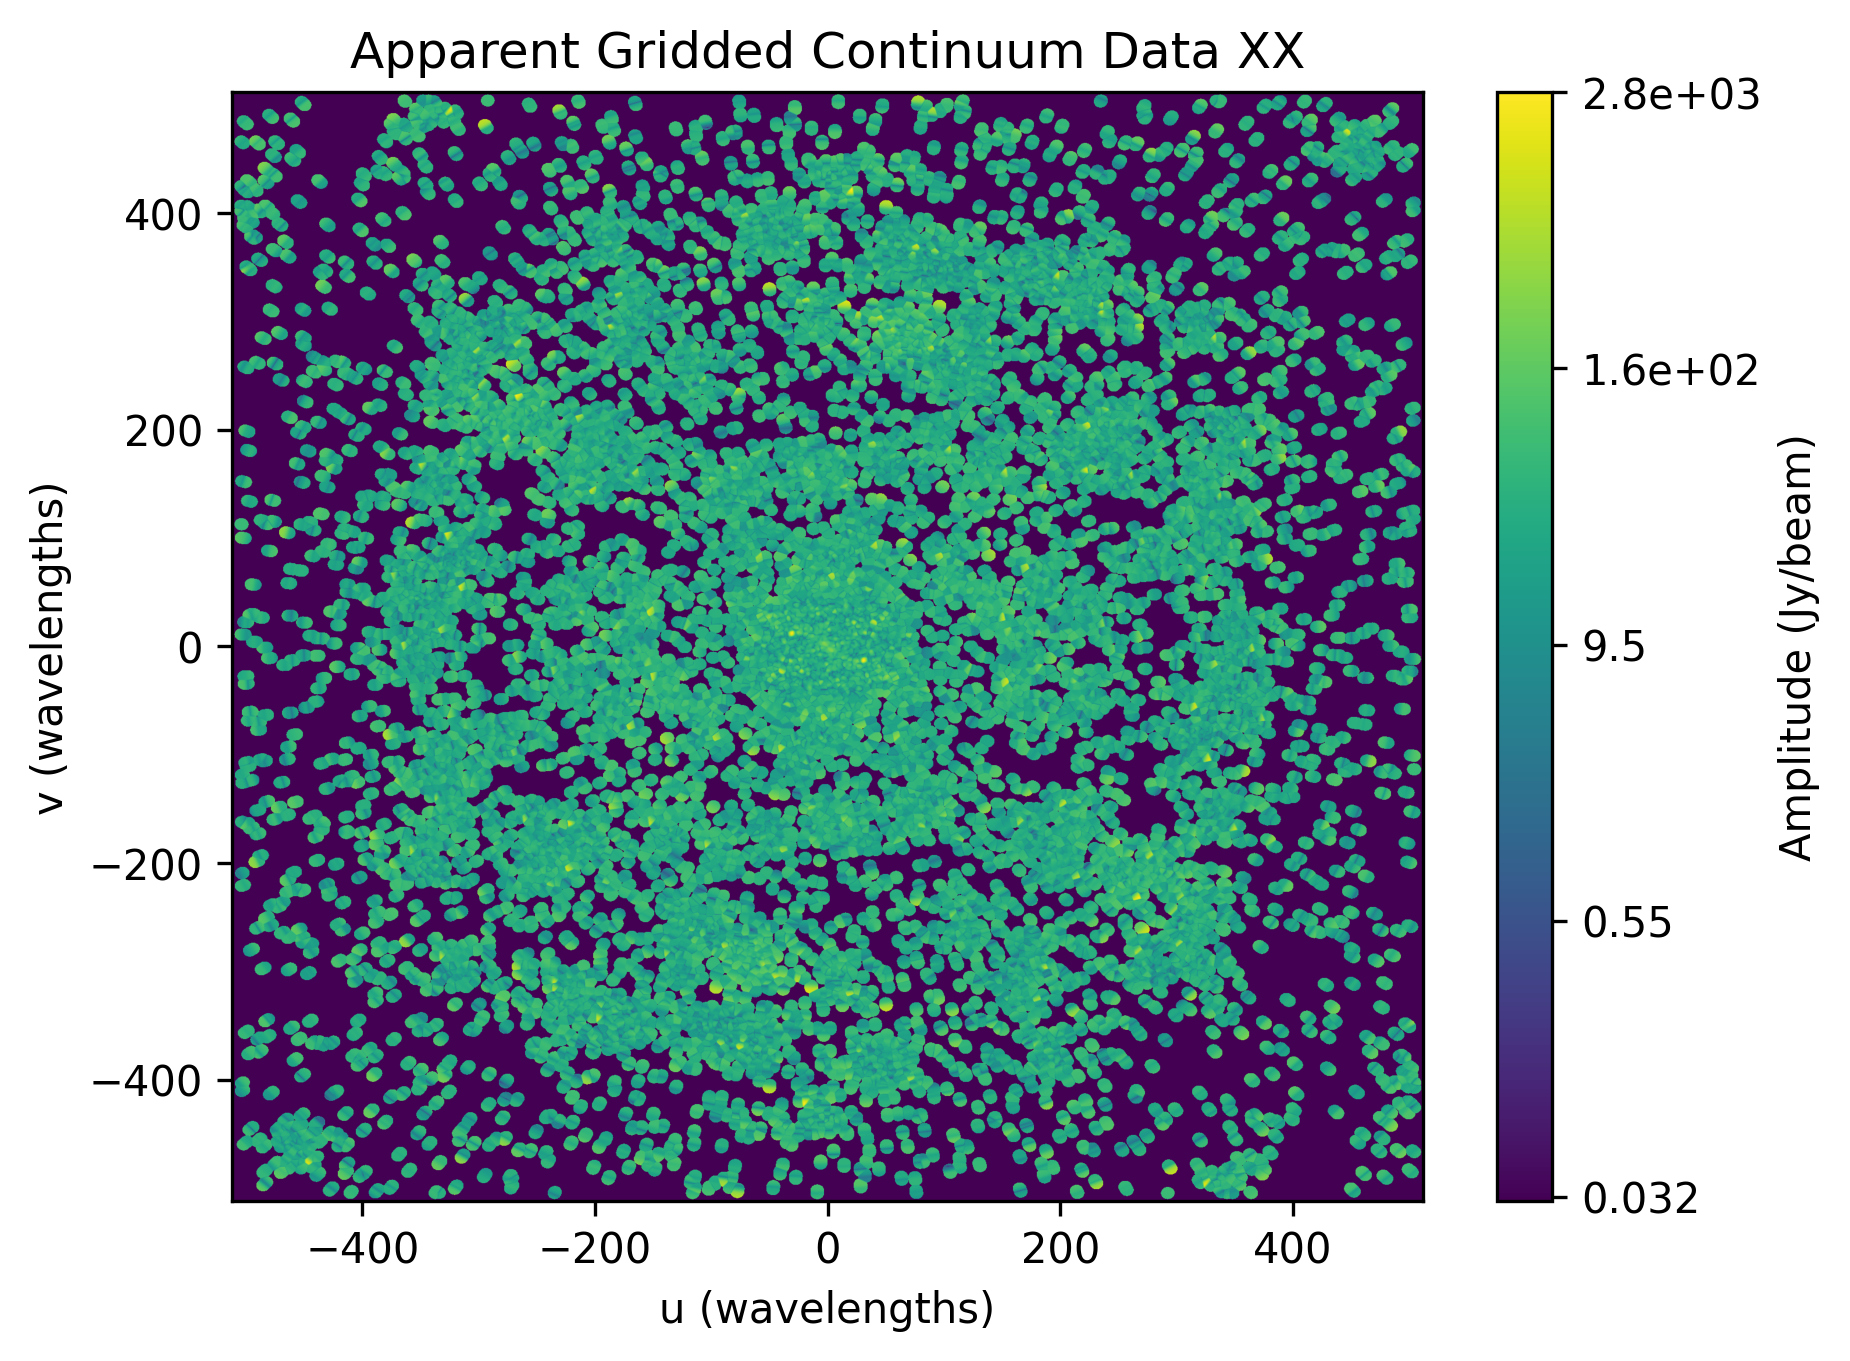
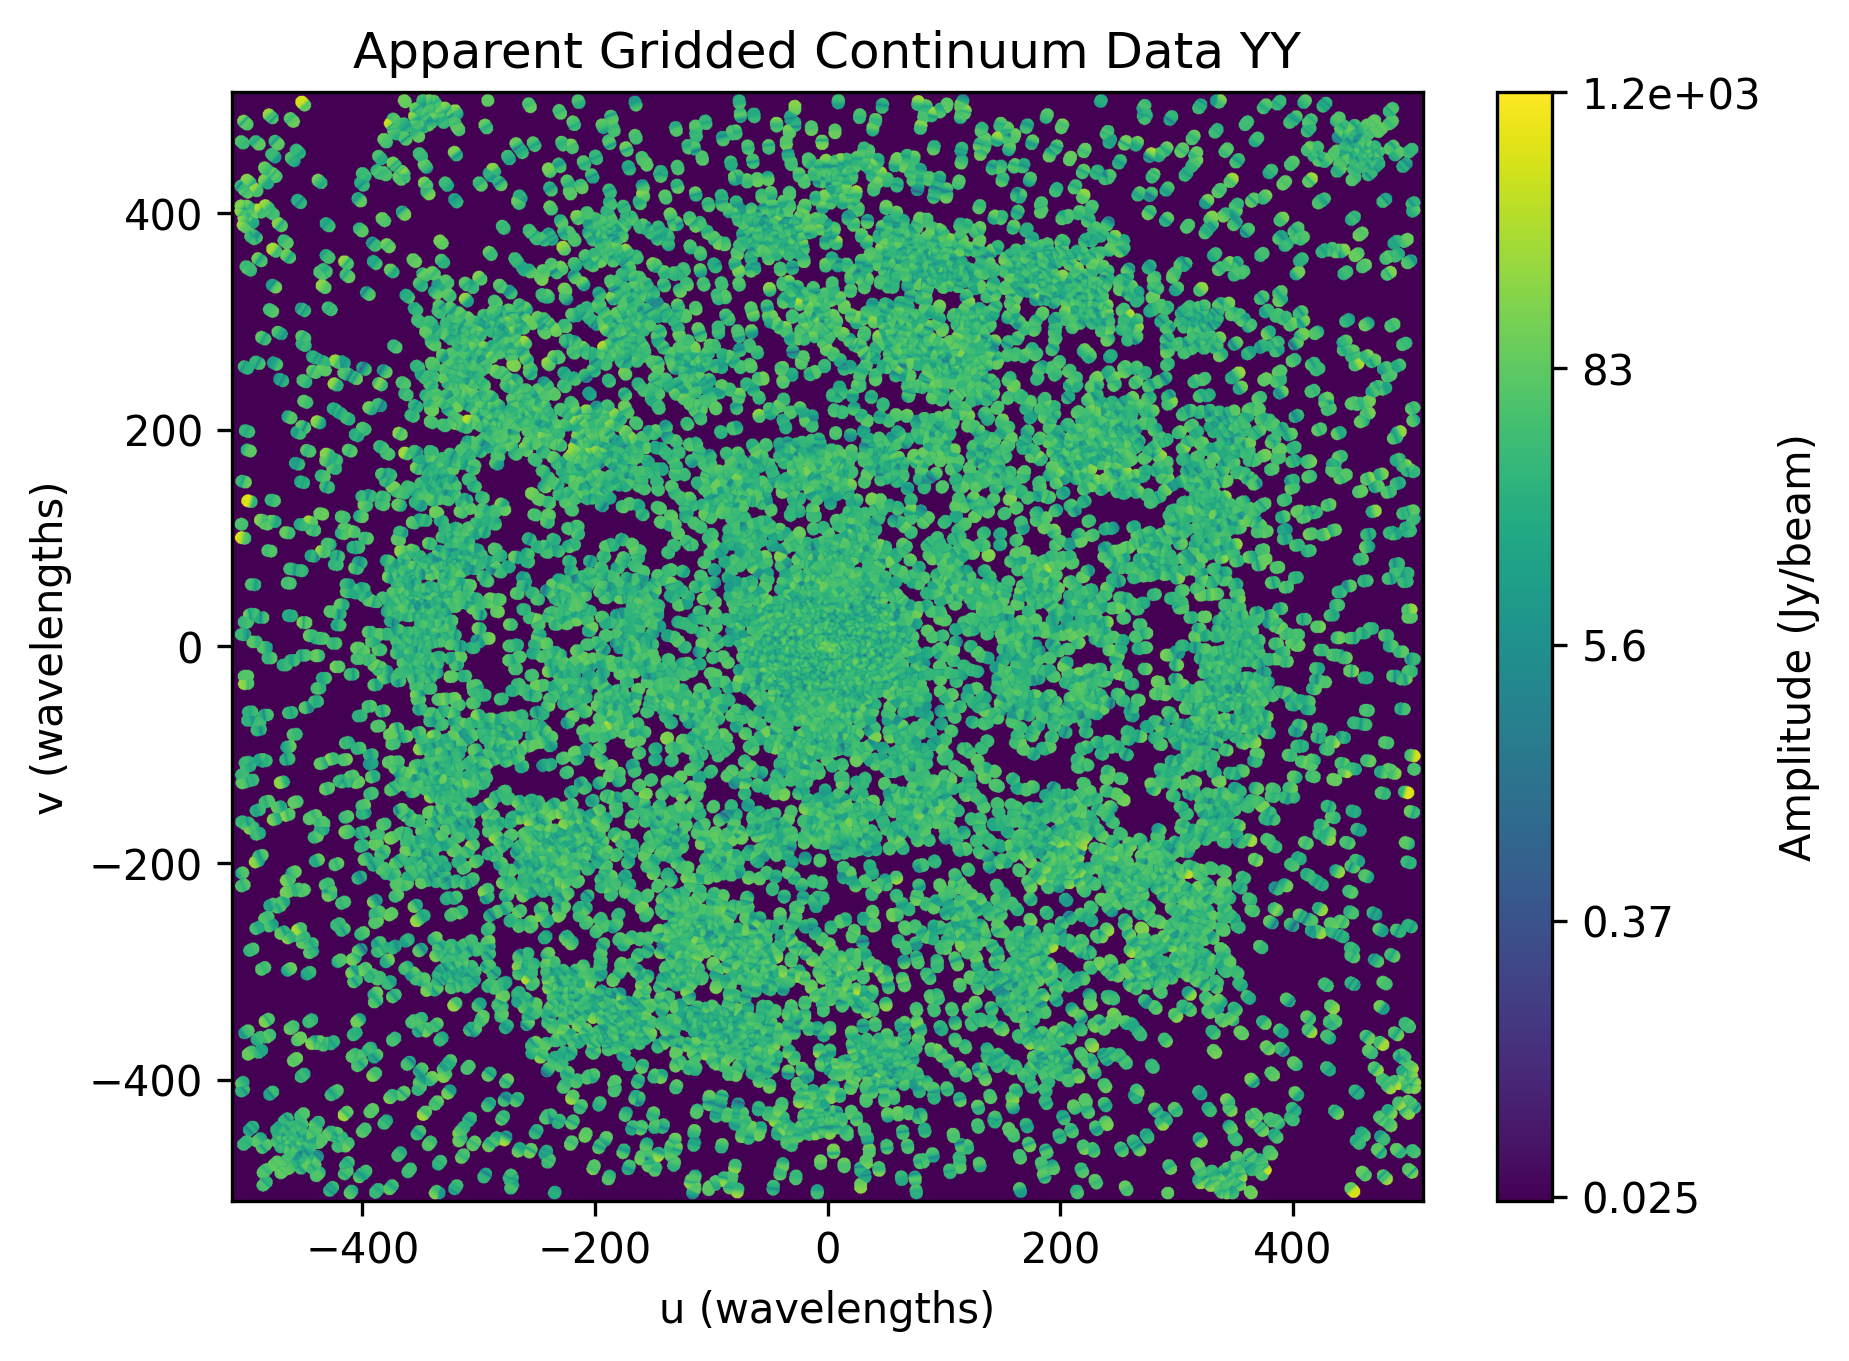
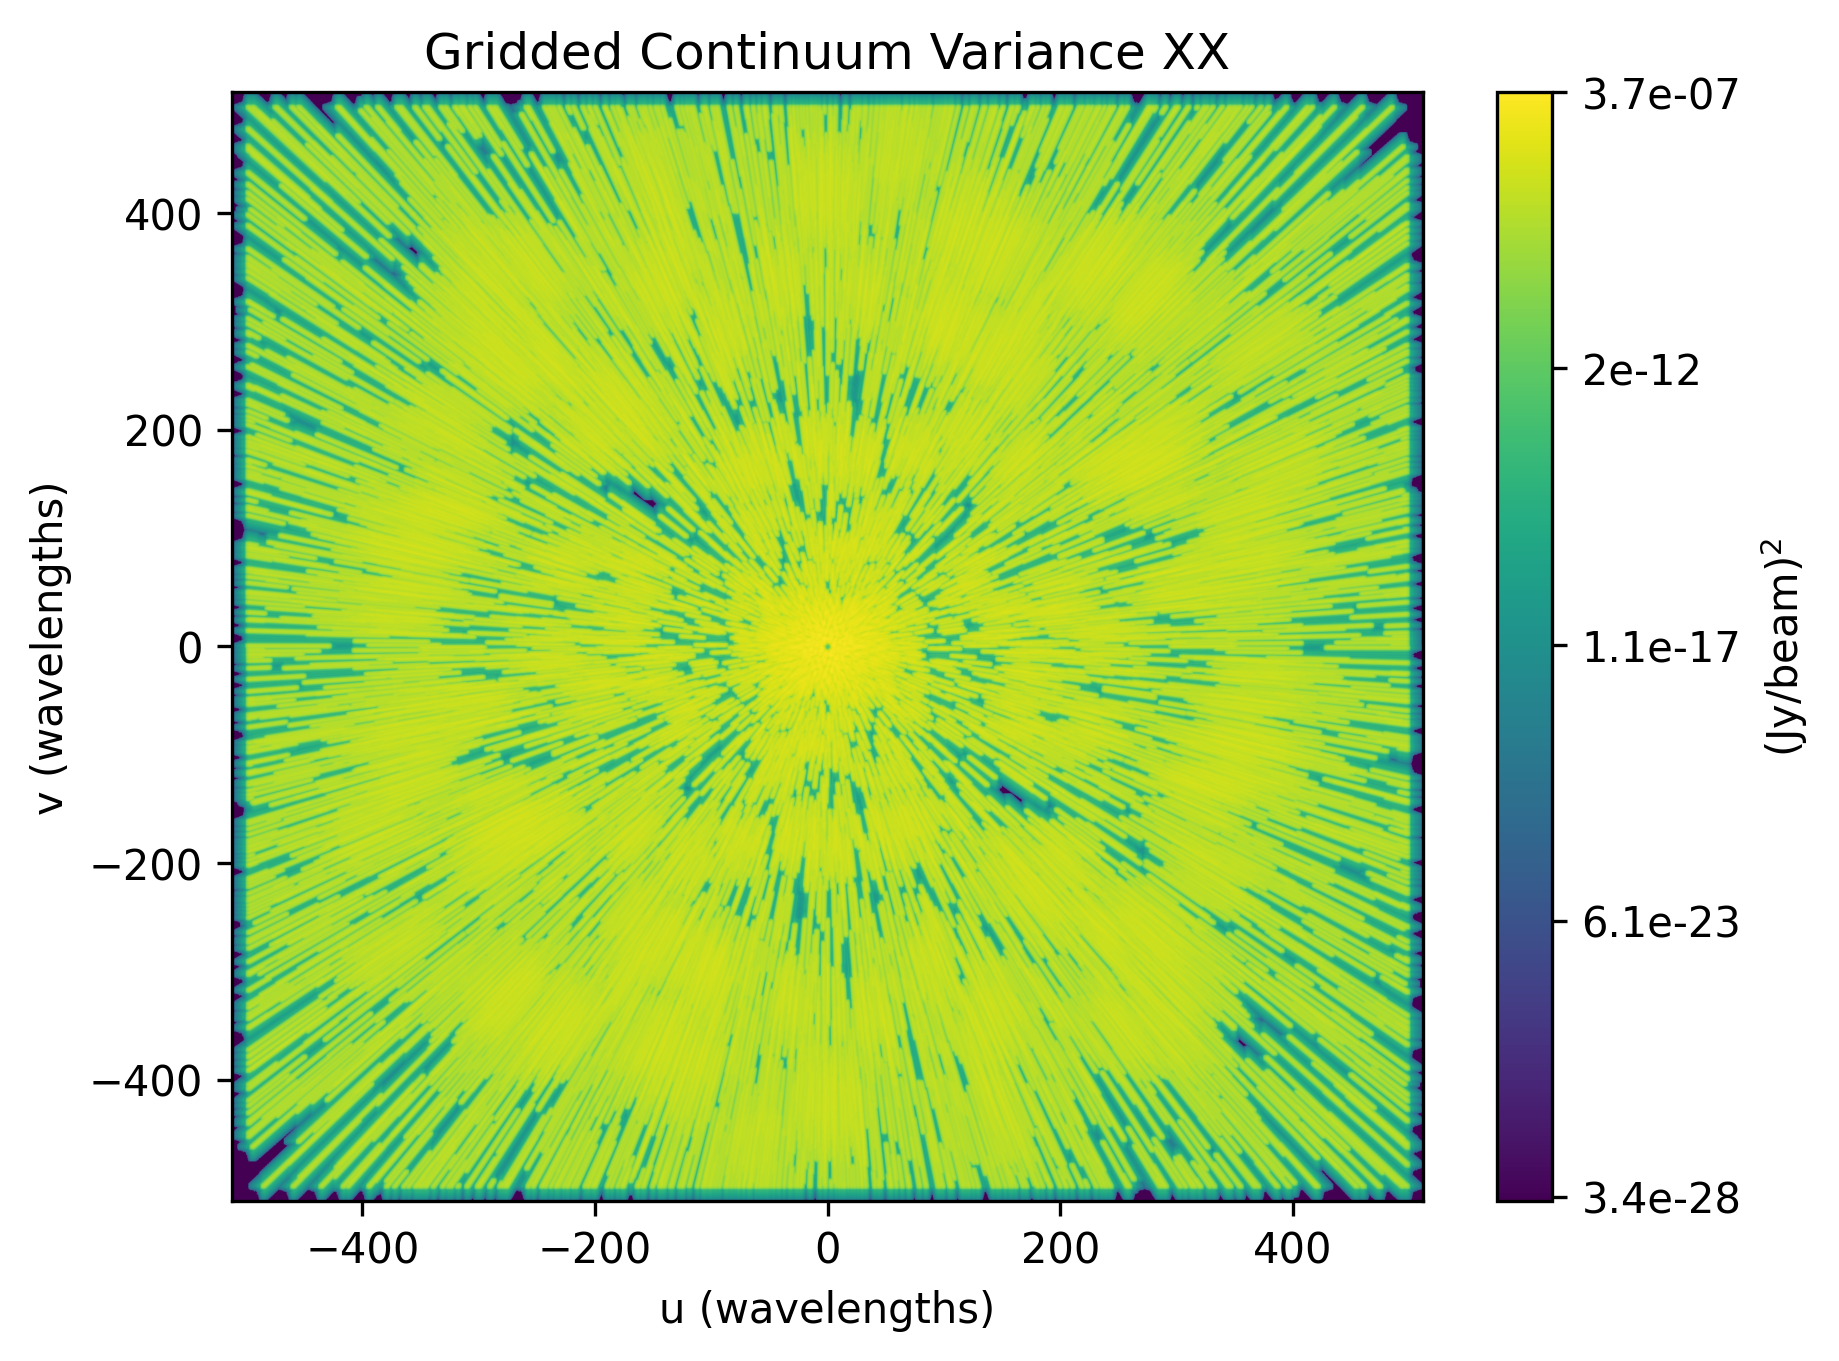
Below we have the example plots of the gridded continuum data for the two polarizations, XX and YY, for the sample data.
Running Gridding with a full MWA observation
In this observation we will run calibration and then use the results for gridding,
you’ll notice some more advanced options being used here. Such options like
--digital-gain-jump-polyfit should only be used if you know that it’s needed
(although pyfhd will warn you if you try to use it on the wrong data). Also
take notice that the beam is being loaded here, through the use of the
--saved-beam-file-path option, this is required for gridding to work. If you
wish to learn more about the --lazy-load-beam option refer to Lazy Loading
section below.
pyfhd \
   1088281328 \
   --input-path "/path/to/input/uvfits/1088281328" \
   --output-path "/path/to/output/" \
   --description 1088281328 \
   --saved-beam-file-path "path/to/beams/decomp_beam_pointing0.h5" \
   --lazy-load-beam: true \
   --model-file-type "uvfits" \
   --model-file-path "./path/to/models/1088281328/puma_LoBES_2s_80kHz_hbeam_1088281328.uvfits" \
   --recalculate-grid \
   --image-filter "filter_uv_uniform" \
   --grid-weights \
   --grid-variance \
   --calibrate-visibilities \
   --cable-bandpass-fit \
   --calibration-polyfit \
   --cal-amp-degree-fit 2 \
   --cal-phase-degree-fit 1 \
   --cal-reflection-hyperresolve \
   --cal-reflection-mode-theory 150 \
   --no-cal-reflection-mode-delay \
   --no-cal-reflection-mode-file \
   --no-calibration-auto-fit \
   --no-calibration-auto-initialize \
   --no-cal-adaptive-calibration-gain \
   --vis-baseline-hist \
   --bandpass-calibrate \
   --auto-ratio-calibration \
   --no-cal-time-average \
   --digital-gain-jump-polyfit \
   --calibration-plots \
   --gridding-plots
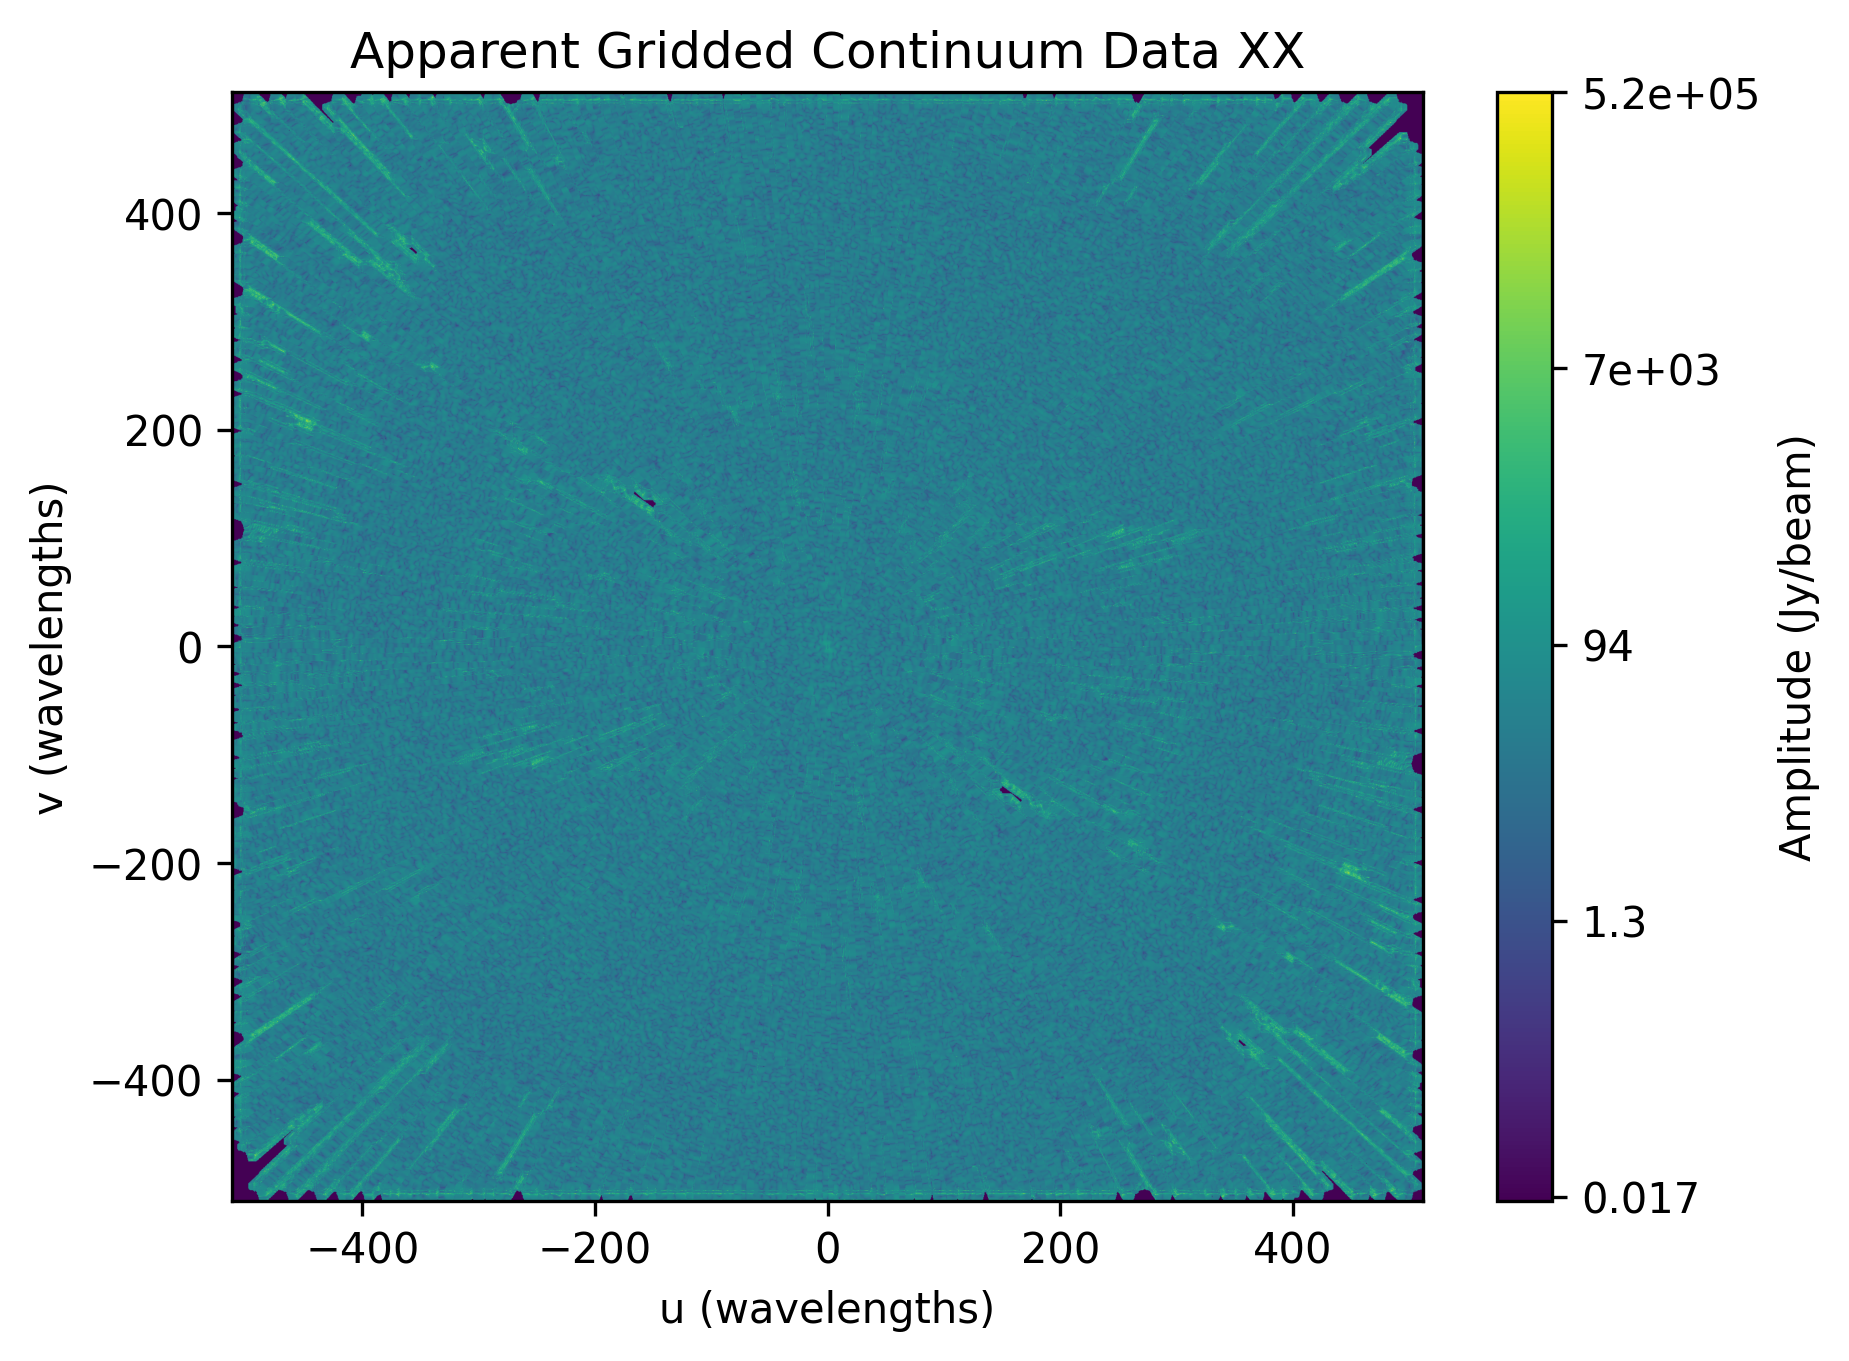
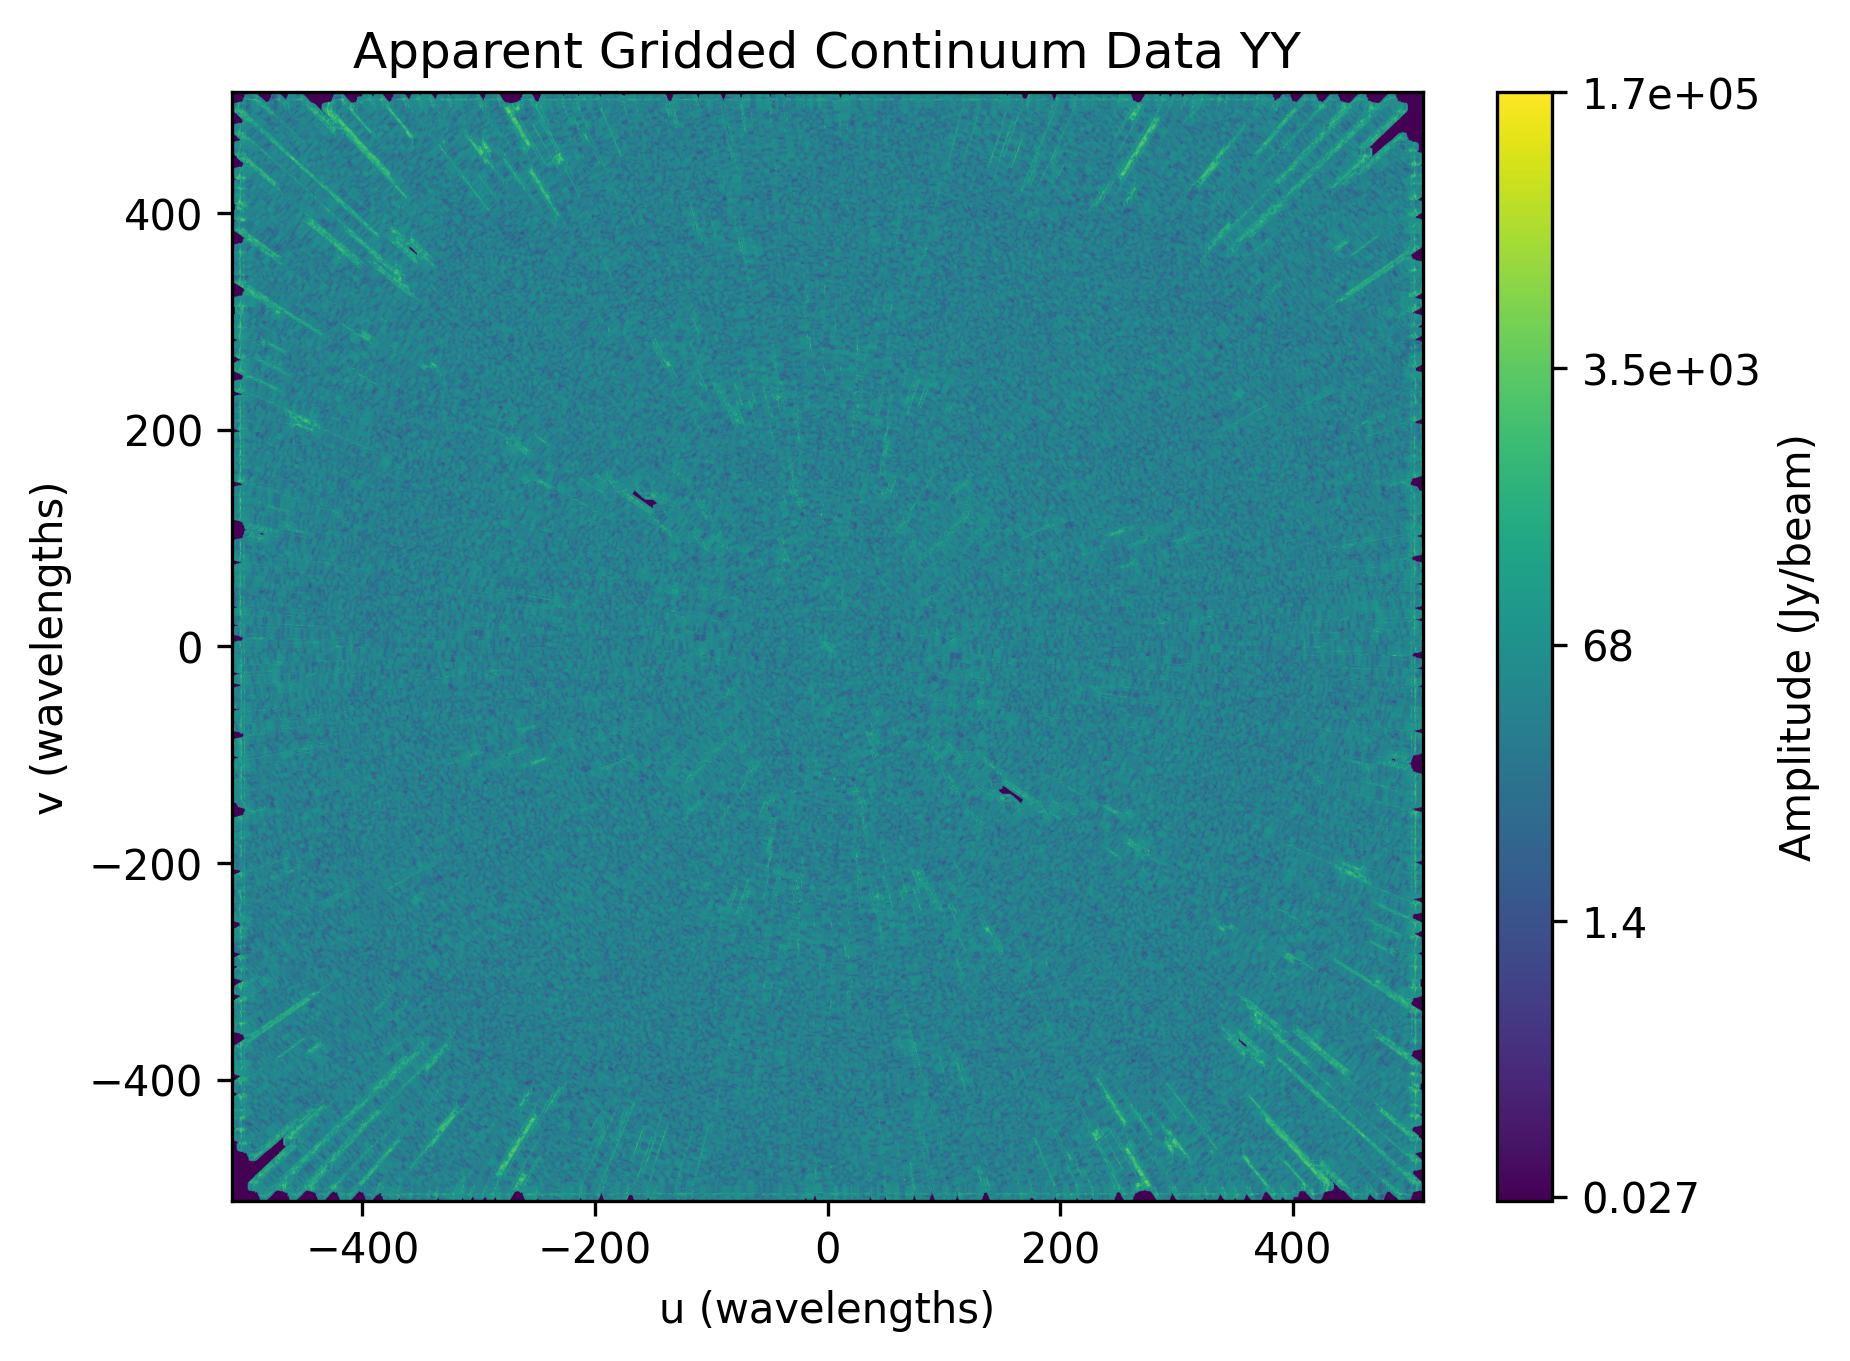
Below we have the example plots of the gridded continuum data for the two polarizations, XX and YY, for the full MWA data.
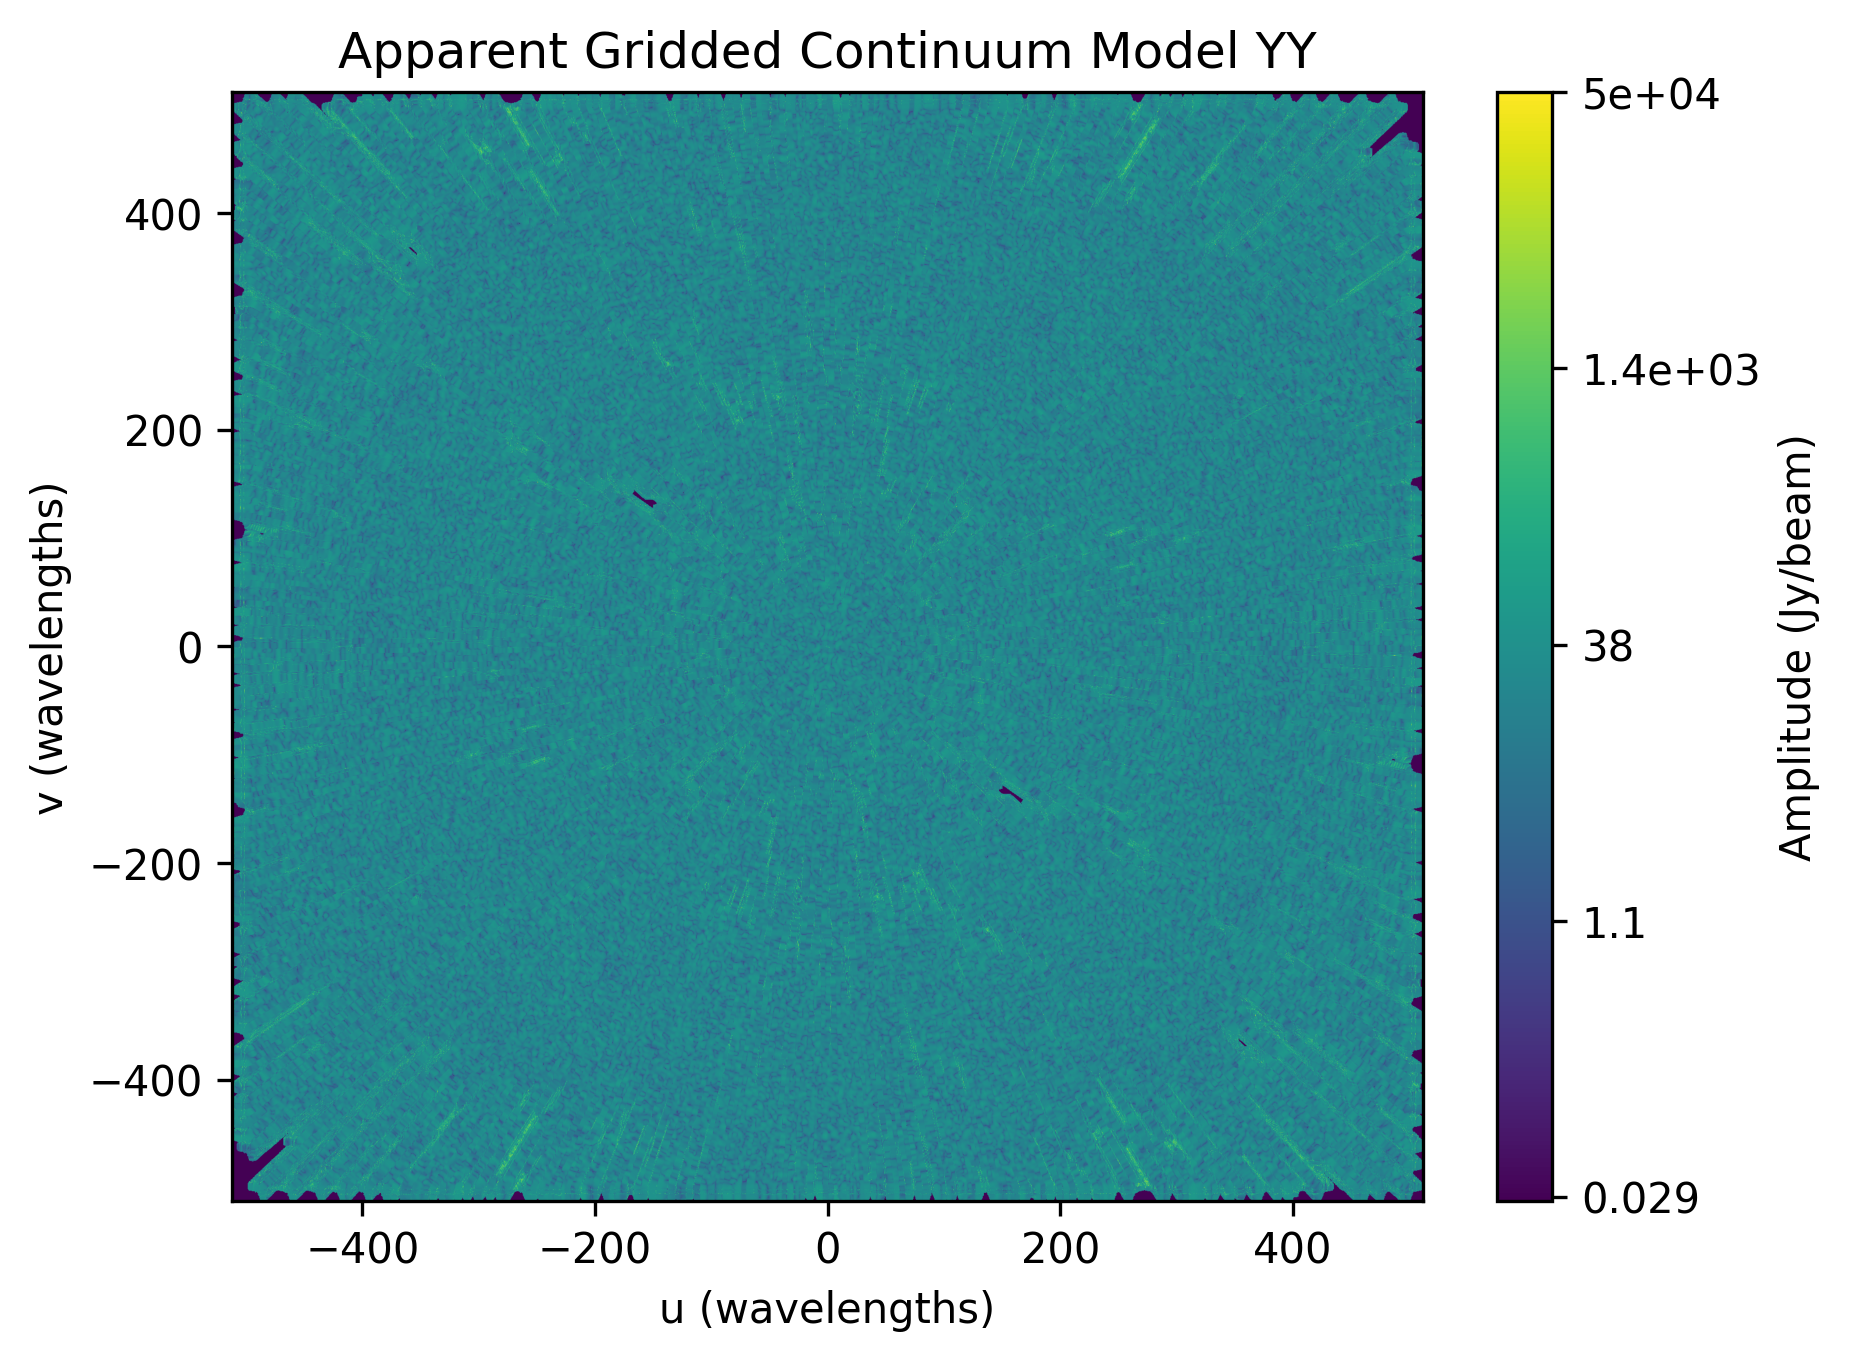
We can also see the continuum gridded model visibilities.

We can also plot the variance of the gridded visibilities.

Other Telescopes
pyfhd was translated and tested with MWA data, but in theory should need
minor adjusting to support additional telescopes.
Important
Getting data for testing additional telescopes is under way, if you wish for pyfhd to support a new telescope we need the following for testing:
UVFITS file
Any associated metadata files you use – MWA uses metafits, but other telescopes may use different formats if any at all
A beam file - IDL SAVE (sav) files, HDF5 (h5) files, if the beam can be done with pyuvdata, please give an example of how to create the beam response
A skymodel file - ideally UVFITS, but we can potentially support other file types as well depending on the complexity
Saving and Loading files
pyfhd uses HDF5 files to store data in general.
pyfhd uses h5py to read and write the files, the main functions that you
can see how pyfhd
saves and loads HDF5 files are in the pyfhd_io module, found here:
pyfhd_io.
More specifically look for the save and load functions.
Examples of both can be seen below:
# Saving
from pyfhd.io.pyfhd_io import save
import numpy as np

example_dict = {
  "example": np.arange(10),
  "example_group": {
    "example_in_group": np.arange(10),
  }
}

save("example.h5", example_dict, "example")

# Loading

from pyfhd.io.pyfhd_io import load

loaded_example = load("example.h5")

print(loaded_example["example"]) # [0, 1, 2, 3, 4, 5, 6, 7, 8, 9]
print(loaded_example["example_group"]["example_in_group"]) # [0, 1, 2, 3, 4, 5, 6, 7, 8, 9]
If you wish to see the contents of the HDF5 file, there are ways outside of pyfhd to do this, you could use extensions for your IDE like H5 Web or you can use CLI tools like h5dump.
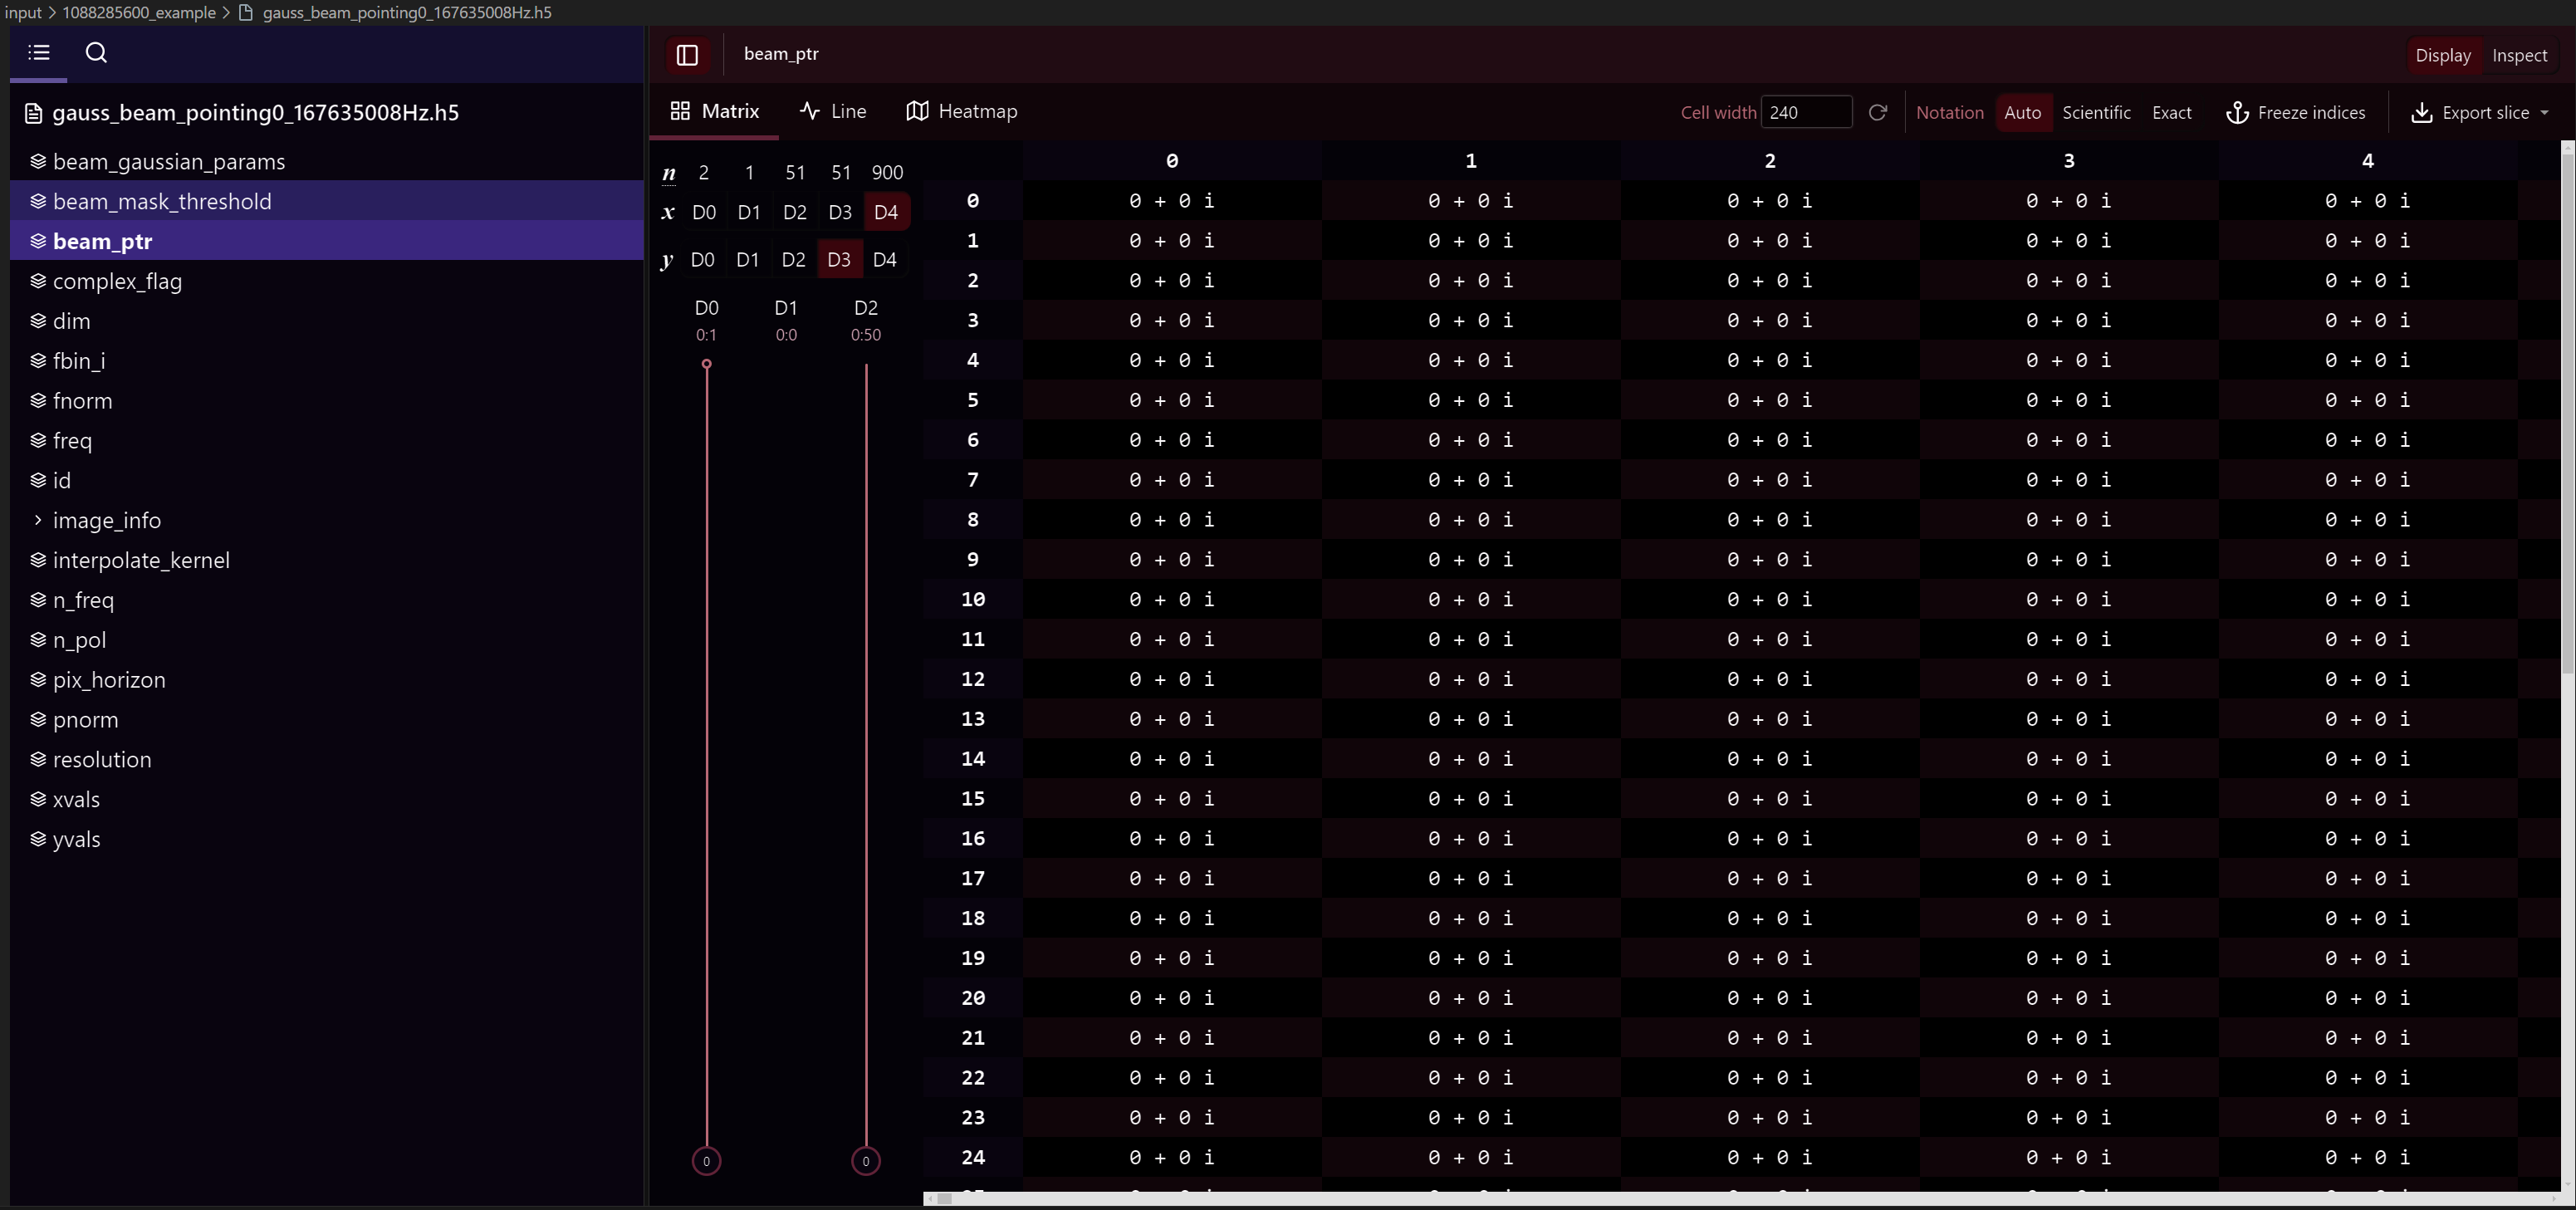
An example of the beam HDF5 file for the sample data seen inside VSCode using H5 Web is shown below:
Lazy Loading
The load function inside of pyfhd also has the capability to lazy load the
data, which means that the data is not loaded into memory until you access it.
This is done by setting the lazy_load argument to True when calling the
load function. It’s important to note that when a HDF5 file is lazy loaded, then
theloaded data is stored inside a HDF5 File object rather than a Python dictionary.
from pyfhd.io.pyfhd_io import load

loaded_example = load("example.h5", lazy_load=True)

print(type(loaded_example)) # <class 'h5py._hl.files.File'>
print(loaded_example["example"]) # <HDF5 dataset "example": shape (10,), type "<i8">
print(loaded_example["example_group"]["example_in_group"]) # <HDF5 dataset "example_in_group": shape (10,), type "<i8">

# To access the data, you need to use the `[:]` operator which tells the H5File object to load the data into memory
# and return it as a numpy array
print(loaded_example["example"][:]) # [0, 1, 2, 3, 4, 5, 6, 7, 8, 9]
print(loaded_example["example_group"]["example_in_group"][:]) # [0, 1, 2, 3, 4, 5, 6, 7, 8, 9]
This is useful primarily for any beam files that are large, as they can take a long time to load into memory and can use a lot of memory.
Tip
If you are using lazy loading, then you need to be careful when using the data, as it is not loaded into memory until you access it. This means that if you try to use the data in a way that requires it to be loaded into memory, you will need to wait for data to transfer from disk to memory, this can cause parts of the pipeline to be slow. Optimizations need to be done to better deal with the transfer of disk to memeory, to better chunk the data into memory for processing. If you’re happy to take that task on yourself, do a Pull Request!
Loading pyfhd Outputs into FHD
pyfhd outputs can be loaded into FHD if you need it, pyfhd outputs are
typically HDF5 files, IDL is capable of reading in HDF5 files using functions like
H5F_OPEN,
H5D_OPEN and
H5D_READ
(There are also the same functions for groups, replace F or D with G).
Loading the pyfhd into FHD does require some data manipulation to get it
in the same format that FHD expects, for example, the beam array is stored as
pointer arrays in FHD on a per baseline basis, where the every baseline points
to the to the first baseline. These sort of pointer array structures are used in
many places across FHD, so to help you in the future, I’ll supply two examples
of how to load the sample data beam and models into IDL and convert them to the
sav files which have the arrays in the format that FHD expects. These examples
are not complete (for example the model doesn’t also create the params file),
but they should give you a good idea of how to load the data into IDL and convert
it to the format that FHD expects.
convert_model_arr_to_sav.pro
PRO convert_model_arr_to_sav,save_dir, obs_id, n_pol

  ;this is the model visibilities as written out by pyfhd
  hdf5_filepath = save_dir + "/" + obs_id + "_vis_model.h5"

  ;load in the hdf5 file
  print, "Now loading model data from ", hdf5_filepath
  file_id = H5F_OPEN(hdf5_filepath)

  ;for as many polarisations as specified by n_pol, write out FHD style .sav
  ;files
  pol_names = ['XX', 'YY', 'XY', 'YX']

  model_dataset_id = H5D_OPEN(file_id, "vis_model_arr")
  ;this reads into a struct containing real and imaginary as separate values
  model_data = H5D_READ(model_dataset_id)

  ; for pol = 0, 0 do begin
  for pol = 0, n_pol-1 do begin

      ;read in this polarisation from the hdf5 file
      ;things have to be saved inside a pointer array for FHD to load it back
      ;in correctly
      vis_model_ptr=PTRARR(1, /allocate)
      *vis_model_ptr[0] = COMPLEX(model_data.r, model_data.i)

      print, "Writing model uvfits to .sav file: " + obs_id + "_vis_model_" + pol_names[pol] + ".sav"

      ;save into the FHD vis_model format and naming convention
      idl_save = save_dir + "/" + obs_id + "_vis_model_" + pol_names[pol] + ".sav"
      save, vis_model_ptr, filename = idl_save

  endfor
  ;close the hdf5 data struct, done with it now
  H5D_CLOSE, model_dataset_id
  ;close file, let's be tidy
  H5F_CLOSE, file_id
END
convert_beam_to_sav.pro
PRO convert_beam_to_sav, save_dir, beam_file, obs_file

  ;this is the model visibilities as written out by pyfhd run
  beam_filepath = save_dir + "/" + beam_file
  obs_filepath = save_dir + "/" + obs_file

  ;load in the hdf5 file
  print, "Now loading model data from ", beam_filepath
  file_id = H5F_OPEN(beam_filepath)

  ;Get all the ints and floats from the hdf5 file
  beam_mask_threshold = H5D_OPEN(file_id, "beam_mask_threshold")
  beam_mask_threshold = H5D_READ(beam_mask_threshold)
  complex_flag = H5D_OPEN(file_id, "complex_flag")
  complex_flag = (H5D_READ(complex_flag))[0]
  dim = H5D_OPEN(file_id, "dim")
  dim = H5D_READ(dim)
  fbin_i = H5D_OPEN(file_id, "fbin_i")
  fbin_i = H5D_READ(fbin_i)
  fnorm = H5D_OPEN(file_id, "freq_norm")
  fnorm = H5D_READ(fnorm)
  freq = H5D_OPEN(file_id, "freq")
  freq = H5D_READ(freq)
  id = H5D_OPEN(file_id, "id")
  id = transpose(H5D_READ(id))
  interpolate_kernel = H5D_OPEN(file_id, "interpolate_kernel")
  interpolate_kernel = (H5D_READ(interpolate_kernel))[0]
  n_freq = H5D_OPEN(file_id, "n_freq")
  n_freq = (H5D_READ(n_freq))[0]
  n_pol = H5D_OPEN(file_id, "n_pol")
  n_pol = (H5D_READ(n_pol))[0]
  pix_horizon = H5D_OPEN(file_id, "pix_horizon")
  pix_horizon = H5D_READ(pix_horizon)
  pnorm = H5D_OPEN(file_id, "pnorm")
  pnorm = H5D_READ(pnorm)
  resolution = H5D_OPEN(file_id, "resolution")
  resolution = H5D_READ(resolution)
  xvals = H5D_OPEN(file_id, "xvals")
  xvals = transpose(H5D_READ(xvals))
  yvals = H5D_OPEN(file_id, "yvals")
  yvals = transpose(H5D_READ(yvals))

  ; image_info
  image_info = H5G_OPEN(file_id, "image_info")
  dec_arr = H5D_OPEN(image_info, "dec_arr")
  dec_arr = transpose(H5D_READ(dec_arr))
  ra_arr = H5D_OPEN(image_info, "ra_arr")
  ra_arr = transpose(H5D_READ(ra_arr))
  psf_image_dim = H5D_OPEN(image_info, "psf_image_dim")
  psf_image_dim = (H5D_READ(psf_image_dim))[0]
  psf_image_resolution = H5D_OPEN(image_info, "psf_image_resolution")
  psf_image_resolution = (H5D_READ(psf_image_resolution))[0]
  h5g_close, image_info
  image_info = ptr_new( $
      create_struct( $
          'dec_arr', dec_arr,$
          'ra_arr', ra_arr, $
          'psf_image_dim', psf_image_dim, $
          'psf_image_resolution', psf_image_resolution $
      ) $
  )


  beam_gaussian_params_h5 = H5D_OPEN(file_id, "beam_gaussian_params")
  beam_gaussian_params_h5 = H5D_READ(beam_gaussian_params_h5)
  beam_gaussian_params_h5 = transpose(beam_gaussian_params_h5)
  beam_gaussian_params_dims = reverse(size(beam_gaussian_params_h5, /dim))
  beam_gaussian_params = PTRARR(beam_gaussian_params_dims[0])
  for pol_i = 0, n_pol - 1 do begin
      beam_gaussian_params[pol_i] = PTR_NEW(beam_gaussian_params_h5[pol_i, *, *])
  endfor


  beam_ptr_h5 = H5D_OPEN(file_id, "beam_ptr")
  beam_ptr_h5 = H5D_READ(beam_ptr_h5)
  dims = size(beam_ptr_h5, /dim)
  beam_ptr = PTR_NEW(PTRARR(n_pol, n_freq, (size(id, /dim))[-1]))
  for pol_i = 0, n_pol-1 do begin
      for freq_i = 0, n_freq-1 do begin
          box_matrix = ptrarr(dims[2], dims[1])
          for box_x = 0, dims[1] - 1 do begin
              for box_y = 0, dims[2] - 1 do begin
                  box_matrix[box_x, box_y] = ptr_new(COMPLEX(beam_ptr_h5[*, box_y, box_x, freq_i, pol_i].r, beam_ptr_h5[*, box_y, box_x, freq_i, pol_i].i))
              endfor
          endfor
          (*beam_ptr)[pol_i, freq_i, *] = PTR_NEW(box_matrix)
      endfor
  endfor

  psf = create_struct( $
      'beam_mask_threshold', beam_mask_threshold, $
      'beam_ptr', beam_ptr, $
      'beam_gaussian_params', beam_gaussian_params, $
      'complex_flag', complex_flag, $
      'dim', dim, $
      'fbin_i', fbin_i, $
      'fnorm', fnorm, $
      'freq', freq, $
      'id', id, $
      'interpolate_kernel', interpolate_kernel, $
      'n_freq', n_freq, $
      'n_pol', n_pol, $
      'pix_horizon', pix_horizon, $
      'pnorm', pnorm, $
      'resolution', resolution, $
      'xvals', xvals, $
      'yvals', yvals, $
      'image_info', image_info $
  )

  obs_file_id = H5F_OPEN(obs_filepath)
  baseline_info_id = H5G_OPEN(obs_file_id, "baseline_info")
  ; dataset     /baseline_info/bin_offset      H5T_INTEGER [2]
  bin_offset = H5D_OPEN(baseline_info_id, "bin_offset")
  bin_offset = H5D_READ(bin_offset)
  ; dataset     /baseline_info/fbin_i          H5T_INTEGER [16]
  fbin_i = H5D_OPEN(baseline_info_id, "fbin_i")
  fbin_i = H5D_READ(fbin_i)
  ; dataset     /baseline_info/freq            H5T_FLOAT [16]
  freq = H5D_OPEN(baseline_info_id, "freq")
  freq = H5D_READ(freq)
  ; dataset     /baseline_info/freq_use        H5T_INTEGER [16]
  freq_use = H5D_OPEN(baseline_info_id, "freq_use")
  freq_use = H5D_READ(freq_use)
  ; dataset     /baseline_info/jdate           H5T_FLOAT [2]
  jdate = H5D_OPEN(baseline_info_id, "jdate")
  jdate = H5D_READ(jdate)
  ; dataset     /baseline_info/tile_a          H5T_INTEGER [16002]
  tile_a = H5D_OPEN(baseline_info_id, "tile_a")
  tile_a = H5D_READ(tile_a)
  ; dataset     /baseline_info/tile_b          H5T_INTEGER [16002]
  tile_b = H5D_OPEN(baseline_info_id, "tile_b")
  tile_b = H5D_READ(tile_b)
  ; dataset     /baseline_info/tile_flag       H5T_INTEGER [128]
  tile_flag = H5D_OPEN(baseline_info_id, "tile_flag")
  tile_flag = H5D_READ(tile_flag)
  ; dataset     /baseline_info/tile_height     H5T_FLOAT [128]
  tile_height = H5D_OPEN(baseline_info_id, "tile_height")
  tile_height = H5D_READ(tile_height)
  ; dataset     /baseline_info/tile_names      H5T_INTEGER [128]
  tile_names = H5D_OPEN(baseline_info_id, "tile_names")
  tile_names = H5D_READ(tile_names)
  ; dataset     /baseline_info/tile_use        H5T_INTEGER [128]
  tile_use = H5D_OPEN(baseline_info_id, "tile_use")
  tile_use = H5D_READ(tile_use)
  ; dataset     /baseline_info/time_use        H5T_INTEGER [2]
  time_use = H5D_OPEN(baseline_info_id, "time_use")
  time_use = H5D_READ(time_use)

  baseline_info = create_struct( $
      'bin_offset', bin_offset, $
      'fbin_i', fbin_i, $
      'freq', freq, $
      'freq_use', freq_use, $
      'jdate', jdate, $
      'tile_a', tile_a, $
      'tile_b', tile_b, $
      'tile_flag', tile_flag, $
      'tile_height', tile_height, $
      'tile_names', tile_names, $
      'tile_use', tile_use, $
      'time_use', time_use $
  )

  H5G_CLOSE, baseline_info_id

  n_baselines = H5D_OPEN(obs_file_id, "n_baselines")
  n_baselines = (H5D_READ(n_baselines))[0]
  n_pol = H5D_OPEN(obs_file_id, "n_pol")
  n_pol = (H5D_READ(n_pol))[0]

  baseline_info = ptr_new(baseline_info)
  obs = create_struct( $
      'baseline_info', baseline_info, $
      'nbaselines', n_baselines, $
      'n_pol', n_pol, $
      'primary_beam_area', ptrarr(4),$
      'primary_beam_sq_area', ptrarr(4) $
  )

  save, psf, obs, filename = save_dir + "/gauss_beam_pointing0_167635008Hz.sav"
  ;close the hdf5 file
  H5F_CLOSE, file_id
  H5F_CLOSE, obs_file_id

END
Docker
pyfhd has a docker image available to use available on
Docker Hub.
There will be multiple images available, there will be an image for each version
that should get pushed on every release of pyfhd, there will also be a
latest tag that will be the latest version of pyfhd based on commits
from the main branch (though this may not be stable and subject to change).
To run the docker image of pyfhd, you can use the following commands:
# To see the pyfhd version of latest
docker run skywa7ch3r/pyfhd:latest pyfhd -v
# grab the sample data into your machine
docker run --volume .:/pyfhd/input --user $(id -u):$(id -g) skywa7ch3r/pyfhd:latest pyfhd --get-sample-data 1088285600
# To run pyfhd with the sample data (with the output going to the current directory)
docker run --volume /path/to/output:/pyfhd/output --volume /path/to/1088285600_example:/pyfhd/input/1088285600_example --user $(id -u):$(id -g) skywa7ch3r/pyfhd:latest  \
  pyfhd -c ./input/1088285600_example/1088285600_example.yaml \
  --description 108825600_docker_example \
  1088285600
The folllwing example will run with the full MWA observation, you will need to
make sure the yaml configuration file points to directories that are mounted to
the docker container.
The YAML configuration also should point to directories inside the container as
well, by default pyfhd is configured to look for things inside the input
and output directories inside the container.
# To run pyfhd with full MWA observation
docker run -it \
  --volume /absolute/path/to/config/1091128160.yaml:/pyfhd/input/1091128160.yaml \
  --volume /absolute/path/to/data/1091128160/:/pyfhd/input/1091128160 \
  --volume /absolute/path/to/beams/:/pyfhd/input/beams \
  --volume /absolute/path/to/output/:/pyfhd \
  --user $(id -u):$(id -g)
  skywa7ch3r/pyfhd:latest \
  pyfhd -c ./input/1091128160.yaml \
  --description 1091128160_docker_example \
  1091128160
Apptainer (formerly Singularity)
Creating an Apptainer image for using pyfhd where using docker isn’t possible
(such as on HPCs) can be done like so:
apptainer build pyfhd.sif docker://skywa7ch3r/pyfhd:latest
# To see the pyfhd version of latest
apptainer run --pwd /pyfhd pyfhd.sif pyfhd -v
# To run pyfhd with the sample data (with the output going to the current directory)
apptainer run --pwd /pyfhd -B /path/to/output:/pyfhd/output pyfhd.sif \
  pyfhd -c ./input/1088285600_example/1088285600_example.yaml \
  --description 108825600_docker_example \
  1088285600
The following example will run with the full MWA observation, you will need to
make sure the yaml configuration file points to directories that are mounted to
the docker container.
The YAML configuration also should point to directories inside the container as
well, by default pyfhd is configured to look for things inside the input
and output directories inside the container.
# To run pyfhd with full MWA observation
apptainer run --pwd /pyfhd \
  -B /absolute/path/to/config/1091128160.yaml:/pyfhd/input/1091128160.yaml \
  -B /absolute/path/to/data/1091128160/:/pyfhd/input/1091128160 \
  -B /absolute/path/to/beams/:/pyfhd/input/beams \
  -B /absolute/path/to/output/:/pyfhd \
  pyfhd.sif \
  pyfhd -c ./input/1091128160.yaml \
  --description 1091128160_docker_example \
  1091128160
Problems that need to be solved
Attention
This entire section is a call to action!
If you believe you can address these problems, and or do the features, then give it a go, please read the Contribution Guide and do a pull request!
We await your contributions!
HEALPIX
The HEALPIX outputs from pyfhd are stored in the healpix directory. The
translated parts of healpix_snapshot_cube_generate.pro from FHD have
precision errors and potential bugs and they have caused differences in the
resulting obs_id_hpx_even/odd_XX/YY.h5 files the translation that exist in
FHD. So the obs_id_hpx_even/odd_XX/YY.h5 files generated from pyfhd
as the obs_id_even/odd_cubeXX/YY.sav files that exist in FHD.
However I’m not sure if they should be given that the differentces could just
precision in which case there might be a problem at all. Furthermore the size of
the files that get generated and the format, is not easy to create in Python and
takes a long time to create with regards to the rest of the pyfhd pipeline
(and the resulting files are also large in when compared to other outputs).
Recent tests also show issues with the fits files produced for HEALPIX as well.
With that said, by default healpix files are generated, the entirety of pyfhd
runs in full. If you want to ensure that HEALPIX files are generated then adjust
a config of your choice with the following options:
# Export
output-path : './output'
save-healpix-fits: true # IMPORTANT
snapshot-healpix-export : true # IMPORTANT

# HEALPIX (These are the defaults)
ps-kbinsize : 0.5
ps-kspan : 600
ps-beam-threshold: 0
ps-fov: ~
ps-dimension: ~
ps-degpix: ~
ps-nfreq-avg: ~
ps-tile-flag-list: []
n-avg : 2
rephase-weights: True
restrict-healpix-inds : true
healpix-inds: ~
split-ps-export : true
The most important options are the save-healpix-fits and the
snapshot-healpix-export options, which are set to true by default and are
the toggles which allow the HEALPIX functions to be called.
Beam Setup
There are several choices for how to set up a beam in pyfhd, beams are
required for gridding and de-gridding operations.
The approach used in the sample data and the tutorial is to use a beam that is
saved out of FHD (or pyFHD). To use this option, pass the beam file location
using the saved-beam-file-path configuration option.
The most common approach is to use the UVBeam object from pyuvdata to read
in a beam Jones matrix and decompose it into the terms needed for FHD. Then
FHD translation is used to create the representation of the beam in UV space.
To use this option, pass the beam file location using the uvbeam-file-path
configuration option. If you are using this option, you can also use the
uvbeam-freq-buffer to specify a buffer in Hz around the data frequency range
to use when reading in the beam. It should be set to at least twice the frequency
resolution of the beam (e.g. 2e6 is a reasonable value for the MWA beam,
which has 1 MHz resolution). Setting the buffer too small can result in
interpolation errors. If you do not set uvbeam-freq-buffer, the full beam
file will be read it, which can increase the memory usage.
Finally you can use analytic beams that are sub-classes of the pyuvdata
AnalyticBeam object (a number are built into pyuvdata but the infrastructure
is extensible and writing your own analytic beam is straight forward).
Note that analytic beams are currently sampled in image space and then Fourier
Transformed to uv space in pyFHD. They are not used as analytic functions in uv space.
To use this option, you must pass a yaml string enclosed in quotations to the
analytic-beam-yaml configuration option. Details on how to compose these
yaml strings are in the pyuvdata documentation, but generally you must include
the analytic beam class and any required parameters to initialize the beam.
For the moment, pyfhd only supports using one beam per observation and does not
currently support different beams for different antennas. Furthermore, more
advanced features like gaussian decomp and many of the debugging options are not
implemented, so there are plenty of opportunities to add to the beam_setup,
both in small and large pieces of code.
You may run into memory limitations with your machine during testing, you can
decrease memory use by setting beam-nfreq-avg to larger values
(as high as the number of frequencies in your input file), at the cost of reduced
accuracy in the frequency evolution of the beam.
Deconvolution
Deconvolution is not currently implemented in pyfhd, with that said, inside
the gridding directory is visibility_degrid.py, which has been translated
from FHD and has not been tested at all.
That should give you a good start if you wish to implement deconvolution in
pyfhd. As a bonus, the deconvolution code in FHD has many dependencies
that are used in the model generation, so if for whatever reason you want the
skymodel generation from FHD you might get most of that model generation code
for free, if someone also does deconvolution in pyfhd, you’ll likely be only
a week or two away from having model generation also.
Although, there’s a good chance tools like WODEN will likely be faster and
better at producing skymodels, so use those first before you try to implement
model generation in pyfhd.
4 Polarizations
The ability for pyfhd to handle 4 polarizations is not well tested, and may not be fully implemented in places, another great opportunity to contribute.
Simulation
FHD has ability to do simulations, many of these simulation features haven’t
been translated to pyfhd, this would be a large piece of work.